Mazda 6 Service Manual: Rear washer hose removal/installation
1. Disconnect the negative battery cable.
2. Remove the washer tank. (See WASHER TANK REMOVAL/INSTALLATION)
3. Partially peel off the right side mud guard.
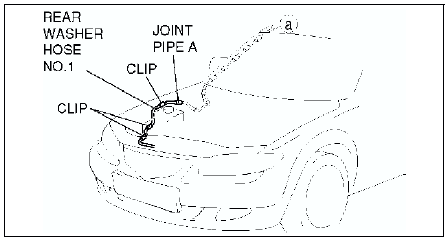
4. Remove rear washer hose No.1 from the clips.

5. Remove rear washer hose No.1 and joint pipe A.
6. Remove the A-pillar trim. (See A-PILLAR TRIM REMOVAL)
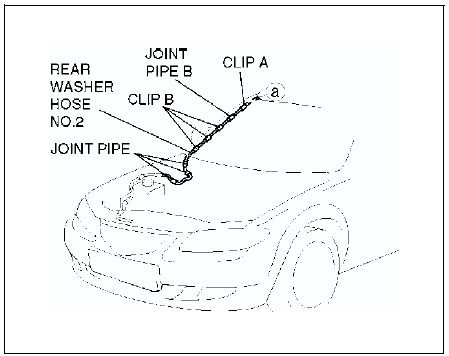
7. Remove rear washer hose No.2 from clip A.

8. Remove clips B from the body.
9. Remove rear washer hose No.2 and joint pipes B.
10. Remove the C-pillar trim. (See C-PILLAR TRIM REMOVAL/INSTALLATION)
11. Remove the liftgate upper trim. (See LIFTGATE UPPER TRIM REMOVAL/INSTALLATION)
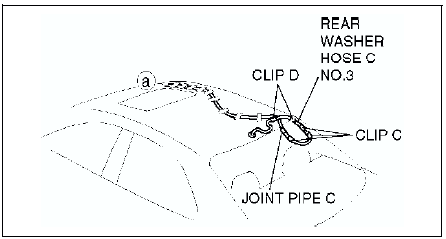
12. Remove rear washer hose No.3 from clip C.

13. Remove clips D from the body.
14. Remove rear washer hose No.3 and joint pipe C.
15. Remove the headliner. (See HEADLINER REMOVAL/INSTALLATION)
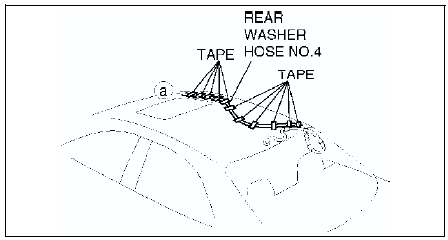
16. Remove the tape from rear washer hose No.4.

17. Install in the reverse order of removal.
 Rear washer nozzle adjustment
Insert a needle or an equivalent tool into the spray hole of the rear washer
nozzle and adjust the nozzle direction as shown.
REAR WASHER NOZZLE CLEANING
Clean the rear washer nozzle. (See WINDS ...
 Intermittent rear wiper relay removal/installation
5HB
1. Disconnect the negative battery cable.
2. Remove the trunk side trim. (See TRUNK SIDE TRIM REMOVAL/INSTALLATION)
3. Remove in the order indicated in the table.
4. Install in the reverse ...
Other materials:
Mazda 6 Service Manual: Front door speaker inspection
1. Inspect for resistance between the front door speaker terminals using an
ohmmeter.
If not as specified, replace the front door speaker.
2. To verify that the front door speaker outputs sound, apply voltage to the
front door speaker and release using a 1.5-V battery.
If not outp ...
Mazda 6 Service Manual: Automatic transaxle removal/installation
1. Disconnect the negative battery cable.
2. Remove the battery and battery tray.
3. Remove the aircleaner component. (See INTAKE-AIR SYSTEM
REMOVAL/INSTALLATION.)
4. Remove the front tires and splash shield.
5. Remove the under cover.
6. Remove the steering gear and power steering pipe. (See ...
