Mazda 6 Owners Manual: Replacing Exterior Light Bulbs
Headlights (With LED headlights)
Low/High beam bulbs
The LED bulb cannot be replaced as a single unit because it is an integrated unit.
The LED bulb has to be replaced with the unit. We recommend an Authorized Mazda Dealer when the replacement is necessary.
Headlights (With halogen headlights)
Low-beam bulbs
1. Make sure the ignition is switched off, and the headlight switch is off.
2. If you are changing the right bulb, start the engine, turn the steering wheel all the way to the left, and turn off engine.
If you are changing the left bulb, turn the steering wheel to the right.
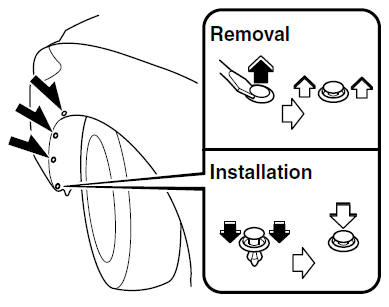
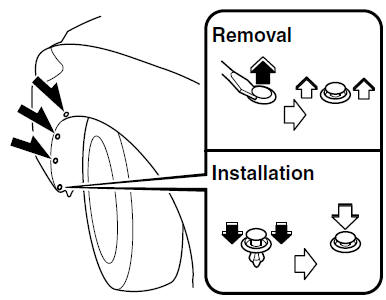
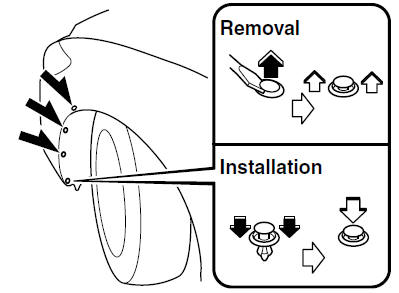
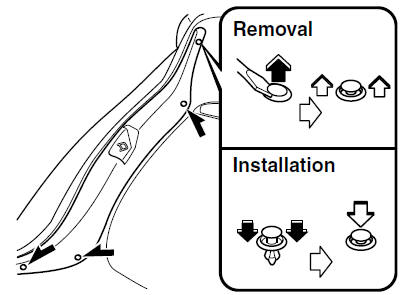
3. Pull the center of each plastic retainer and remove the retainers.
4. Turn the screw counterclockwise and remove it, and then partially peel back the mudguard.
5. Disconnect the connector from the unit by pressing the tab on the connector with your finger and pulling the connector downward.
6. Turn the socket and bulb assembly to remove it. Carefully remove the bulb from its socket in the reflector by gently pulling it straight backward out of the socket.
7. Install the new bulb in the reverse order of the removal procedure.
High-beam bulbs/Daytime running lights
(Left side)
1. Make sure the ignition is switched off, and the headlight switch is off.
2. Lift the hood.
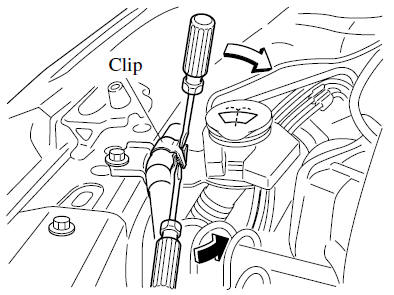
3. Remove the clip.
4. Move the air cleaner cover and create a space large enough to work in.
5. Disconnect the connector from the unit by pressing the tab on the connector with your finger and pulling the connector downward.

6. Turn the socket and bulb assembly to remove it. Carefully remove the bulb from its socket in the reflector by gently pulling it straight backward out of the socket.
7. Install the new bulb in the reverse order of the removal procedure.
(Right side)
1. Make sure the ignition is switched off, and the headlight switch is off.
2. Lift the hood.
3. Disconnect the clip.
4. Remove the windshield washer fluid reservoir and bolts.
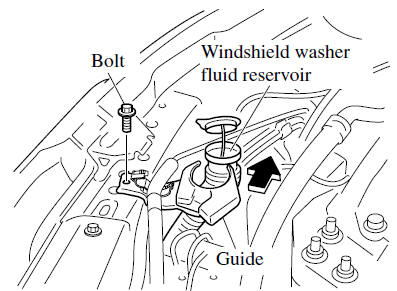
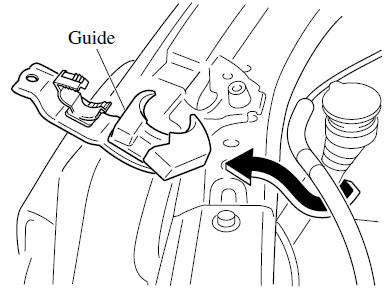
5. Remove the guide.
6. Disconnect the connector from the unit by pressing the tab on the connector with your finger and pulling the connector downward.
7. Turn the socket and bulb assembly to remove it. Carefully remove the bulb from its socket in the reflector by gently pulling it straight backward out of the socket.
8. Install the new bulb in the reverse order of the removal procedure.
Daytime running lights/Parking lights (With LED headlights), Signature wing illumination (some models)
The LED bulb cannot be replaced as a single unit because it is an integrated unit. The LED bulb has to be replaced with the unit. We recommend an Authorized Mazda Dealer when the replacement is necessary.
Front turn signal lights/Front sidemarker lights, Parking lights (With halogen headlights)
1. Make sure the ignition is switched off, and the headlight switch is off.
2. If you are changing the right bulb, start the engine, turn the steering wheel all the way to the left, and turn off engine.
If you are changing the left bulb, turn the steering wheel to the right.
3. Pull the center of each plastic retainer and remove the retainers.
4. Turn the screw counterclockwise and remove it, and then partially peel back the mudguard.
5. Turn the socket and bulb assembly counterclockwise and remove it.
6. Disconnect the bulb from the socket.
Front turn signal lights/Front sidemarker lights
Parking lights (With halogen headlights)

7. Install the new bulb in the reverse order of the removal procedure.
Fog lights (With LED headlights) (Some models)
The LED bulb cannot be replaced as a single unit because it is an integrated unit. The LED bulb has to be replaced with the unit. We recommend an Authorized Mazda Dealer when the replacement is necessary.
Fog lights (With halogen headlights) (Some models)
1. Make sure the ignition is switched off, and the headlight switch is off.
2. If you are changing the right bulb, start the engine, turn the steering wheel all the way to the left, and turn off engine. If you are changing the left bulb, turn the steering wheel to the right.
3. Pull the center of each plastic retainer and remove the retainers.
4. Turn the screw counterclockwise and remove it, and then partially peel back the mudguard.
5. Disconnect the connector from the unit by pressing the tab on the connector with your finger and pulling the connector downward.
6. Turn the socket and bulb assembly to remove it. Carefully remove the bulb from its socket in the reflector by gently pulling it straight out of the socket.
7. Install the new bulb in the reverse order of the removal procedure.
Brake lights, Taillights, High-mount brake light, Side-turn signal lights, Rear side-marker lights (With LED headlights)
The LED bulb cannot be replaced as a single unit because it is an integrated unit.
The LED bulb has to be replaced with the unit. We recommend an Authorized Mazda Dealer when the replacement is necessary.
Rear turn signal lights, Rear sidemarker lights (With halogen headlights)
1. Make sure the ignition is switched off, and the turn signal switch is off.
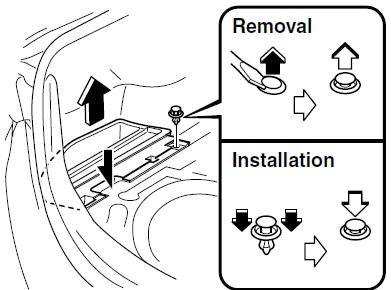
2. Lift the trunk mat.
3. (Left side)
Pull the center of each plastic retainer and remove the retainers and the pocket.
(Right side)
Remove the pocket.
(Left side)
(Right side)
4. Pull the center of each plastic retainer and remove the retainers and the trunk end trim.
5. Pull the center of each plastic retainer and remove the retainers and the trunk side trim.
6. Turn the socket and bulb assembly counterclockwise and remove it.
7. Disconnect the bulb from the socket.
Rear turn signal lights
Rear side-marker lights
8. Install the new bulb in the reverse order of the removal procedure.
Taillights (Trunk lid side) (With LED headlights)
The LED bulb cannot be replaced as a single unit because it is an integrated unit. The LED bulb has to be replaced with the unit. We recommend an Authorized Mazda Dealer when the replacement is necessary.
Taillights (Trunk lid side) (With halogen headlights), Reverse lights
1. Make sure the ignition is switched off, and the headlight switch is off.
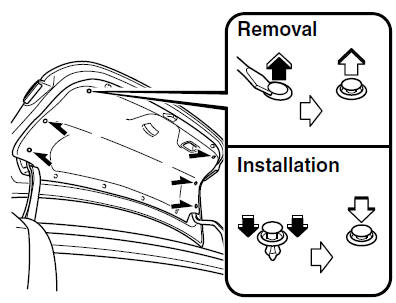
2. Pull the center of each plastic retainer and remove the retainers and the trunk lid trim.
3. (Reverse lights)
Disconnect the electrical connector from the bulb by pressing the tab on the connector with your finger and pulling the connector.
4. Turn the socket and bulb assembly counterclockwise and remove it.
5. Disconnect the bulb from the socket.
Taillights (Trunk lid side)
Reverse lights
6. Install the new bulb in the reverse order of the removal procedure.
License plate lights
1. Make sure the ignition is switched off, and the headlight switch is off.
2. Wrap a flathead screwdriver with a soft cloth to prevent damage to the lens, and then remove the lens by carefully prying on the edge of the lens with a flathead screwdriver.
3. Disconnect the bulb by pulling it out.
4. Install the new bulb in the reverse order of the removal procedure.
 Light Bulbs
With LED Headlights
With Halogen Headlights
WARNING
Never touch the glass portion of a halogen bulb with your bare hands and
always wear eye protection when handling or working around the bul ...
 Replacing Interior Light Bulbs
Overhead lights/Front map lights (LED type), Rear map lights (LED type)
The LED bulb cannot be replaced as a single unit because it is an integrated
unit. The LED bulb has to be replaced with the u ...
Other materials:
Mazda 6 Owners Manual: Brake/Clutch Fluid
Inspecting Brake/Clutch Fluid Level
WARNING
If the brake/clutch fluid level is low, have the brakes inspected:
A low brake/clutch fluid level is dangerous. A low level could indicate brake lining
wear or a brake system leak which could cause the brakes to fail and lead to an
accident.
The b ...
Mazda 6 Owners Manual: Child-Restraint Precautions
Mazda strongly urges the use of child-restraint systems for children small enough
to use them.
You are required by law to use a child-restraint system for children in the U.S.
and Canada. Check your local and state or provincial laws for specific requirements
regarding the safety of children ...