
Mazda 6 Owners Manual: Seat Operation
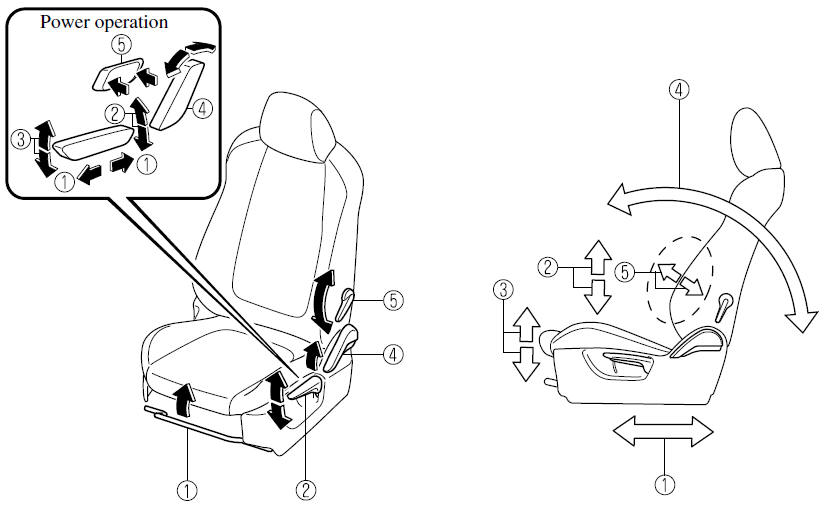
1. Seat Slide
(Manual Seat)
To move a seat forward or backward, raise the lever and slide the seat to the desired position and release the lever.
Make sure the lever returns to its original position and the seat is locked in place by attempting to push it forward and backward.
(Power Seat)
To slide the seat, move the slide lifter switch on the outside of the seat to the front or back and hold it. Release the switch at the desired position.
2. Height Adjustment
(Manual Seat)
To adjust the seat height, move the lever up or down.
(Power Seat)
To adjust the seat height, move the switch up or down.
3. Height Adjustment for Front Edge of Seat Bottom (Driver's Power Seat)
To adjust the front height of the seat bottom, raise or lower the front of the slide lifter switch.
4. Seat Recline
(Manual Seat)
To change the seatback angle, lean forward slightly while raising the lever. Then lean back to the desired position and release the lever.
Make sure the lever returns to its original position and the seatback is locked in place by attempting to push it forward and backward.
(Power Seat)
To change the seatback angle, press the front or rear side of the reclining switch. Release the switch at the desired position.
5. Lumbar Support Adjustment (Driver's Seat)
(Manual Operation)
To increase the seat firmness, move the lever forward. Move the lever backward to decrease firmness.
(Power Operation)
To increase the seat firmness, press and hold the front part of the switch to the desired position, then release it.
Press the rear part of the switch to decrease firmness.
 Front Seat
...
 Seat Warmer (Some models)
The front seats are electrically heated. The ignition must be switched ON.
Press the seat warmer switch while the ignition is switched ON to operate the
seat warmer. The indicator lights turn on to ...
Other materials:
Mazda 6 Owners Manual: Operation
System triggering conditions
The horn sounds intermittently and the hazard warning lights flash for about
30 seconds when the system is triggered by any one of the following:
Unlocking a door with the key, door lock switch, or an inside door-lock
knob.
Forcing open a door, the hood or th ...
Mazda 6 Owners Manual: Variable intake-air system (vis) control solenoid valve inspection (l3)
1. Remove the VIS control solenoid valve. (See INTAKE-AIR SYSTEM
REMOVAL/INSTALLATION.)
2. Inspect airflow between the ports under the following conditions.
If not as specified, replace the VIS control solenoid valve.
If as specified, carry out the Circuit Open/Short Inspection.
Circ ...