
Mazda 6 Service Manual: Bumper reinforcement removal/installation
1. Disconnect the negative battery cable.
2. Remove the front bumper. (See FRONT BUMPER REMOVAL/INSTALLATION.)
3. Remove the headlight. (See FRONT COMBINATION LIGHT REMOVAL/INSTALLATION.)
4. Suport the radiator and the condenser using the wire.
5. Remove the bolt.
6. Remove the bumper reinforcement.
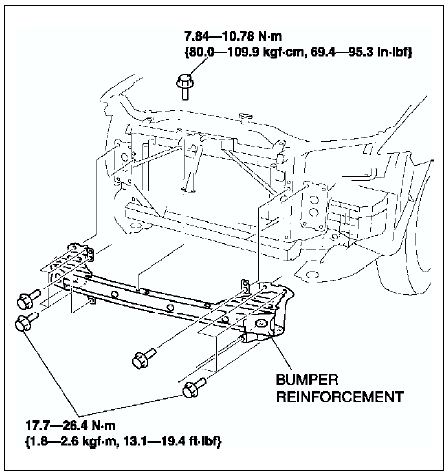
7. Install in the reverse order of removal.
 Front bumper disassembly/assembly
1. Disassemble in the order indicated in the table.
2. Assemble in the reverse order of disassembly. ...
 Rear bumper removal/installation
1. Disconnect the negative battery cable.
2. Remove the rear combination light.
3. Remove in the order indicated in the table.
4. Install in the reverse order of removal.
Rear Bumper Removal N ...
Other materials:
Mazda 6 Service Manual: Fuel line pressure inspection
Warning
Fuel line spills and leakage are dangerous. Fuel can ignite and
cause serious injuries or death. Fuel can also irritate skin and eyes. To
prevent this, always complete the BEFORE REPAIR PROCEDURE. (See BEFORE
REPAIR PROCEDURE.)
Caution
Disconnecting/connecting the quick r ...
Mazda 6 Service Manual: Split Folding
By lowering the rear seatbacks the luggage compartment space can be expanded.
WARNING
Do not drive the vehicle with occupants on folded down seatbacks or in
the luggage compartment. Putting occupants in the luggage compartment
is dangerous because seat belts cannot be fastened which coul ...