Mazda 6 Service Manual: Condenser removal/installation
1. Disconnect the negative battery cable.
2. Discharge the refrigerant from the system. (See RECOVERY.) (See CHARGING.)
3. Remove the shroud panel. (See SHROUD PANEL REMOVAL/INSTALLATION.)
Caution
- If moisture or foreign material enters the refrigeration cycle, cooling ability will be lowered and abnormal noise will occur. Always immediately plug all open fittings after removing any refrigeration cycle parts to keep moisture or foreign material out of the cycle.
4. Remove in the order indicated in the table. Do not allow compressor oil to spill.
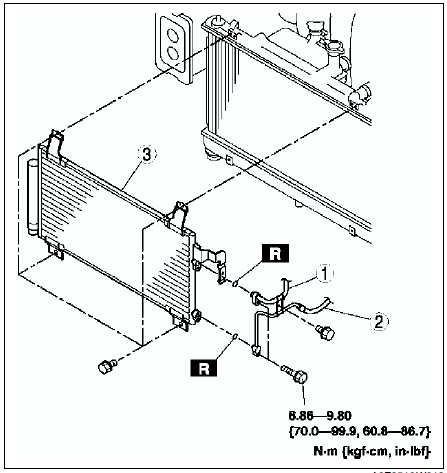
5. Install in the reverse order of removal.
6. Perform the refrigerant system performance test. (See REFRIGERANT SYSTEM PERFORMANCE TEST.)
Condenser Installation Note
1. When installing a new condenser, add a supplemental amount of ATMOS GU10 compressor oil inlet the refrigerant cycle.
Supplemental amount (approximate quantity) 20 ml {20 cc, 0.7 fl oz}
 A/c compressor removal/installation
1. Disconnect the negative battery cable.
2. Discharge the refrigerant from the system. (See RECOVERY.) (See CHARGING.)
3. Remove the right side splash shield and mudguard (L.H.D. only).
4. Loosen ...
 Condenser inspection
1. Inspect for cracks, damage, and oil leakage.
If any are found, replace the condenser.
2. Inspect for fins clogged by dust.
If any are clogged, remove the dust from the fins.
3. Inspec ...
Other materials:
Mazda 6 Service Manual: Operating Tips for AAC
AAC stands for Advanced Audio Coding, which is standardized voice compression
established by the ISO*1 working group (MPEG). Audio data can be created and stored
at a higher compression ratio than MP3.
This unit plays files with the extensions (.aac/.m4a/.wav) as the AAC files.
*1 Internationa ...
Mazda 6 Service Manual: Fuel Gauge (Without Multiinformation Display)
The fuel gauge shows approximately how much fuel is remaining in the tank when
the ignition is switched ON. We recommend keeping the tank over 1/4 full.
If the low fuel warning light illuminates or the fuel level is very low, refuel
as soon as possible.
Refer to Warning Lights.
NOTE
...