Mazda 6 Service Manual: A/c compressor removal/installation
1. Disconnect the negative battery cable.
2. Discharge the refrigerant from the system. (See RECOVERY.) (See CHARGING.)
3. Remove the right side splash shield and mudguard (L.H.D. only).
4. Loosen the drive belt and remove it.
Caution
- If moisture or foreign material enters the refrigeration cycle, cooling ability will be lowered and abnormal noise will occur. Always immediately plug open fittings after removing any refrigeration cycle parts to keep moisture or foreign material out of the cycle.
5. Remove in the order indicated in the table. Do not allow compressor oil to spill.
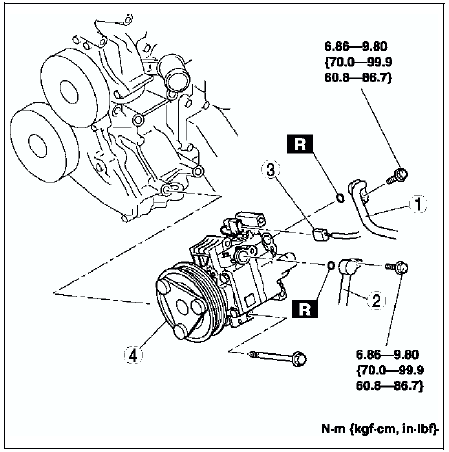
6. Install in the reverse order of removal.
7. Adjust the drive belt.
8. Perform the refrigerant system performance test. (See REFRIGERANT SYSTEM PERFORMANCE TEST.)
A/C Compressor Installation Note
Remove the following amount of compressor oil from the new A/C compressor when replacing the A/C compressor.
Compressor oil to be removed (approximate quantity) 120 ml {120 cc, 4.06 fl oz} - [compressor oil from old A/C compressor + 15 ml {15 cc, 0.5 fl oz}]
 Rear heat duct removal/installation
1. Turn over the front floor covering. (See FRONT FLOOR COVERING
REMOVAL/INSTALLATION.)
2. Remove in the order indicated in the table.
3. Install in the reverse order of removal. ...
 Condenser removal/installation
1. Disconnect the negative battery cable.
2. Discharge the refrigerant from the system. (See RECOVERY.) (See CHARGING.)
3. Remove the shroud panel. (See SHROUD PANEL REMOVAL/INSTALLATION.)
Caution
...
Other materials:
Mazda 6 Service Manual: Headlight bulb removal/installation
Low-beam
Halogen type
1. Disconnect the negative battery cable.
2. Disconnect the front combination light. (See FRONT COMBINATION LIGHT
REMOVAL/INSTALLATION)
3. Remove in the order indicated in the table.
Caution
A halogen bulb generates extremely high heat when it is used. If
the ...
Mazda 6 Service Manual: Radio Reception
AM characteristics
AM signals bend around such things as buildings or mountains and bounce off the
ionosphere.
Therefore, they can reach longer distances than FM signals.
Because of this, two stations may sometimes be picked up on the same frequency
at the same time.
FM characteristics
An ...