Mazda 6 Service Manual: Diagnostic assist function
Structural View
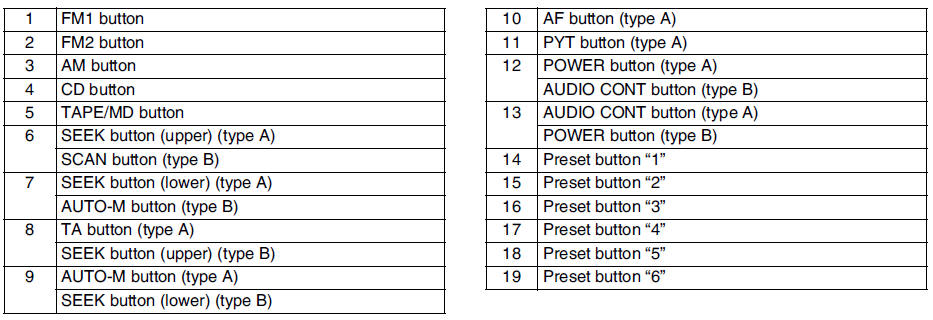
Switch location
LCD Inspection
1. With audio on, first press the POWER button, then simultaneously press the SEEK button (upper) for approximately 1 second.
2. Inspect the LCD according to the following table:

3. Turn the audio off or the ignition switch to the LOCK position to stop the diagnostic assist function.
Button Inspection
1. With audio on, first press the POWER button, then simultaneously press the TAPE/MD button for approximately 1 second.
2. Inspect the button according to the following table:

3. Turn the audio off or the ignition switch to the LOCK position to stop the diagnostic assist function.
Speaker Inspection
1. With audio on, first press the POWER button, then simultaneously press the AUTO-M button for approximately 1 second.
2. Inspect the speaker according to the following table:

3. Turn the audio off or the ignition switch to the LOCK position to stop the diagnostic assist function.
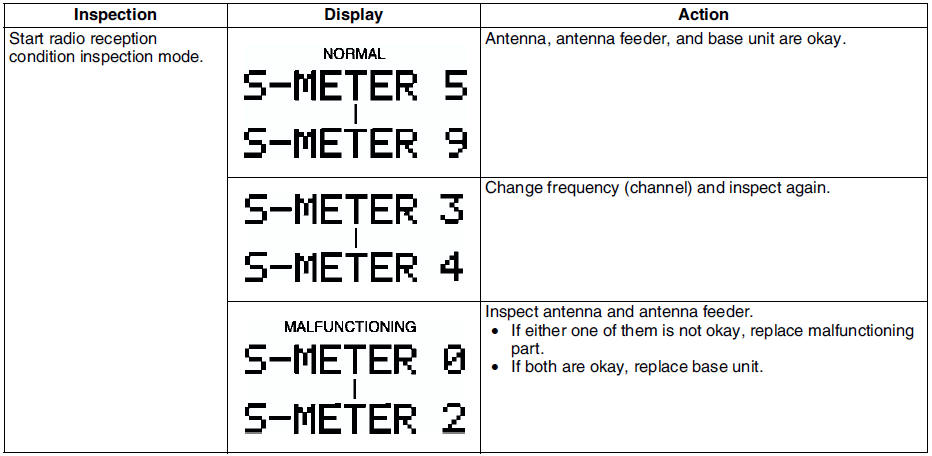
Radio Reception Condition Inspection
1. With audio on and at radio mode, first press the POWER button, then simultaneously press the preset button 2 for approximately 1 second.
2. Inspect the radio reception condition according to the following table:
3. Turn the audio off or the ignition switch to the LOCK position to stop the diagnostic assist function.
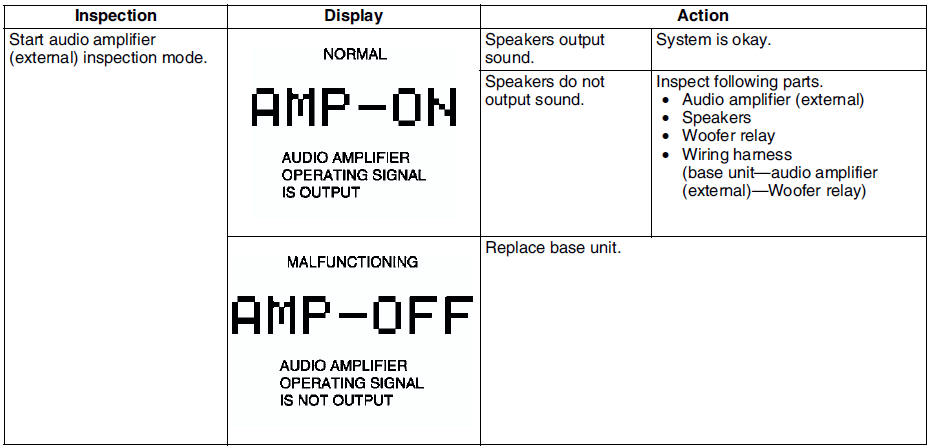
Audio Amplifier (External) Inspection
1. With audio on, first press the POWER button, then simultaneously press the SCAN button for approximately 1 second.
2. Inspect the audio amplifier (external) according to the following table:
3. Turn the audio off or the ignition switch to the LOCK position to stop the diagnostic assist function.
 Dtc 07:er07
Diagnostic procedure
...

Other materials:
Mazda 6 Service Manual: Climate control unit inspection
Full-auto Air Conditioner
1. Connect the all center panel connectors.
2. Turn the ignition switch to ON position.
3. Measure the voltage at each climate control unit terminal and refer to the
terminal voltage list.
If not as specified, inspect the parts listed under Action and the
relate ...
Mazda 6 Service Manual: Seat warmer unit inspection
1. Remove the front seat. (See FRONT SEAT REMOVAL/INSTALLATION.)
2. Remove the seat cushion trim.
3. While inspecting for continuity between the terminals A and B of the
connector, use a dryer to warm the thermostat of the seat warmer unit on seat
cushion.
4. When the indication on the ohmm ...