Mazda 6 Service Manual: Front door unit removal/installation
1. Remove the front door glass.
2. Remove the inner handle.
3. Remove the front door speaker.
4. Disconnect the power window motor connector, front door lock actuator connector, power outside mirror connector.
5. Remove the door harness from the front door unit.
6. Remove the bolts.
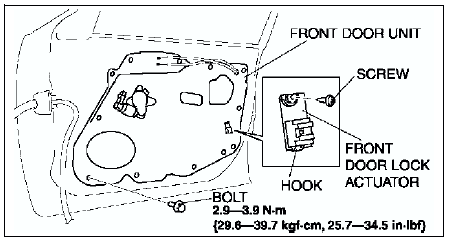
7. Remove the screw.
8. Remove the front door actuator hook from the front door unit.
9. Pull the front door unit slightly towards you, and while keeping the power window regulator from catching on the door, remove the door unit from the door.
10. Pull out the inner handle cable and door lock knob cable from the hole.
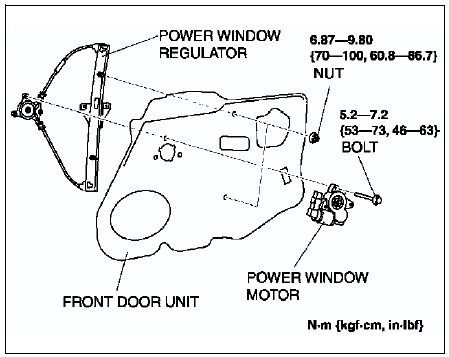
11. Remove the power window motor and power window regulator from the door unit.
12. Install in the reverse order of removal.
 Rear door glass removal/installation
1. Fully down the rear door glass.
2. Remove the rear door trim.
3. Remove the hole cover.
4. Pull up the rear door weatherstrip and remove the screw.
5. Remove the bolt.
6. Remove the glass run ...
 Rear door unit removal/installation
1. Remove the rear door glass.
2. Remove the inner handle.
3. Remove the rear door speaker.
4. Disconnect the power window motor connector, and power door lock actuator
connector.
5. Remove the ...
Other materials:
Mazda 6 Service Manual: Crankshaft position (ckp) sensor inspection
Note
Perform the following inspection only when directed.
Resistance Inspection
1. Disconnect the CKP sensor connector.
2. Measure the resistance between CKP sensor terminals A and B using an
ohmmeter.
If not as specified, replace the CKP sensor.
If CKP sensor resistance is okay, bu ...
Mazda 6 Service Manual: Steps for Determining the Correct Load Limit
Steps for Determining Correct Load Limit-
1. Locate the statement “The combined weight of occupants and cargo should never
exceed XXX kg or XXX lbs.” on your vehicle's placard.
2. Determine the combined weight of the driver and passengers that will be riding
in your vehicle.
3. Subtract t ...