Mazda 6 Service Manual: Inspection of dtcs for operation mode
Note
- The cruise set indicator light will illuminate for 3 seconds? when operation mode is on.
- If the cruise set indicator light does not illuminate for 3 seconds (Operation mode is not on)? the following may be the cause of the malfunction:
- Cruise actuator ignition power supply fuse
- Cruise set indicator light power supply fuse
- Cruise control switch
- Cruise control main switch
- Clock spring for air bag system
- Print plate in instrument cluster
- Cruise set indicator light bulb
- Cruise actuator
- Open or short circuit in following wiring harnesses:
- Between cruise set indicator light and cruise actuator terminal G
- Between fuse block and cruise actuator terminal L
- Between fuse block and instrument cluster
- Between cruise actuator and clock spring
- Between clock spring and cruise control switch
- Open circuit in following wiring harnesses:
- Between cruise actuator terminal I and ground
- Between clock spring and ground
1. Turn the ignition switch to the ON position.
2. Verify that the cruise control main switch is off.
3. Press and hold the RESUME/ACCEL switch on (1), and turn on the cruise control main switch (2). Keep the RESUME/ACCEL switch on for 3 seconds or more
after the cruise control main switch released. (The cruise set indicator light will illuminate for 3 seconds,
showing that the system inspection has started.)
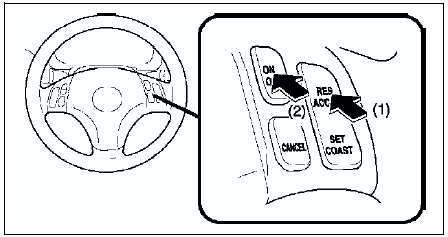
4. Operate each switch as described in the operation code list and note the operation code list pattern.
- If the cruise set indicator light does not flash, inspect the corresponding system area.
- If it flashes, the corresponding DTC(s) will be indicated and mode can be judged normal.
5. The operation mode is canceled by turning the ignition switch to LOCK position or turning off the cruise control main switch.
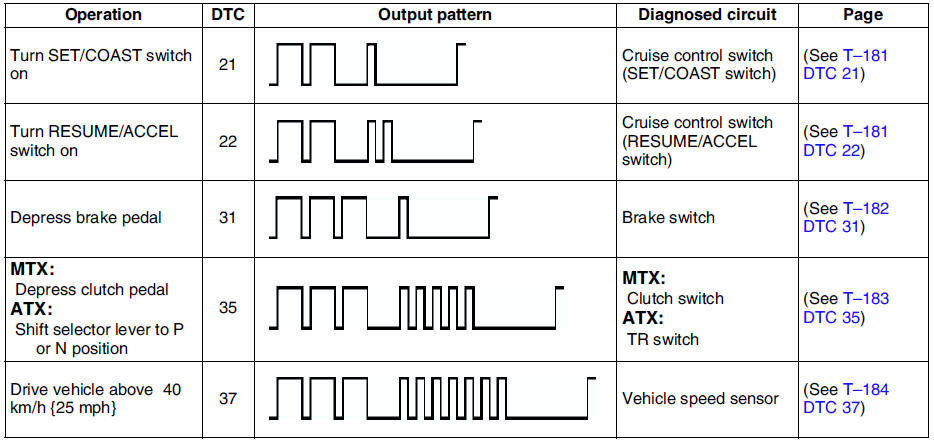
Operation Code List
Inspection of Diagnostic Trouble Codes
Foreword
- When performing an asterisked (*) troubleshooting inspection? shake the wiring harness and connectors while doing the inspection to discover whether poor contact points are the cause of any intermittent malfunction. If there is a problem? check to make sure connectors? terminals and wiring harness are connected correctly and undamaged.
 Foreword
Outline
There are two on-board diagnostic functions: Operation mode, which
inspects for and indicates correct operation of the input signals to the
control module, and condition detection mo ...
 Dtc 21
Diagnostic procedure
...
Other materials:
Mazda 6 Service Manual: Panel light control switch inspection
1. Connect the connector to the panel light control switch.
2. Connect the negative battery cable.
3. Measure the voltage at the panel light control switch using voltmeter.
When inspecting terminal B for continuity, disconnect the panel light
control switch connector.
4. If the value are ...
Mazda 6 Service Manual: Oil cooler disassembly/assembly
1. Disassemble in the order indicated in the table.
2. Assemble in the reverse order of disassembly.
Radiator Outer Tank (In Tank Oil Cooler) Removal Note
1. Inspect the height of the header tabs.
2. Insert the end of a medium tip screwdriver between the end of the header
tab and the out ...