Mazda 6 Service Manual: Manifold absolute pressure (map) sensor inspection
Note
- Perform the following inspection only when directed.
- The following vacuum values are indicated by relative pressure from the MAP sensor.
1. Connect the SSTs
(WDS or equivalent) to the DLC-2.
2. Turn the ignition switch to ON (Engine OFF).
3. Select MAP PID on the SSTs
(WDS or equivalent).
4. Verify that the MAP PID (pressure) and barometric pressure are practically equal.
- If not as verified, perform the Circuit Open/Short Inspection.
- If there is no open or short circuit, replace the MAP sensor.
- If as verified, go to next step.
5. Apply vacuum of -25.0 kPa {-187 mmHg, -7.38 inHg}
to the MAP sensor, and verify that the MAP variation from that of Step 4 is approx. 25.0 kPa {187 mmHg, 7.38 inHg}.
- If not as verified, perform the Circuit Open/Short inspection.
- If there is no open or short circuit, replace the barometric pressure sensor.
Circuit Open/Short Inspection
1. Disconnect the PCM connector. (See PCM REMOVAL/INSTALLATION.)
2. Inspect the following wiring harness for open or short. (Continuity check)
Open circuit
- If there is no continuity, the circuit is open. Repair or replace the harness.
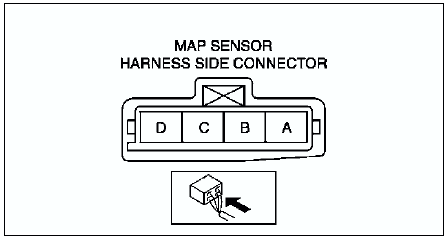
- MAP sensor terminal A (harness-side) and PCM terminal 2H
- MAP sensor terminal D (harness-side) and PCM terminal 1J
- MAP sensor terminal C (harness-side) and PCM terminal 2K
Short circuit
- If there is continuity, the circuit is shorted. Repair or replace the harness.
- MAP sensor terminal C (harness-side) and power supply.
- MAP sensor terminal C (harness-side) and body GND.
- MAP sensor terminal D (harness-side) and power supply.
- MAP sensor terminal D (harness-side) and body GND
 Throttle position (tp) sensor inspection
Note
Perform the following inspection only when directed.
Resistance Inspection
1. Perform the following test only when directed.
If as specified but TP PID value is out of specification, ...
 Engine coolant temperature (ect) sensor removal/installation
Warning
When the engine is hot, it can badly burn. Turn off the engine and
wait until it is cool before removing the ECT sensor.
1. Drain the engine coolant. (See COOLING SYSTEM SERVICE WARN ...
Other materials:
Mazda 6 Service Manual: Operating the Radio
Radio ON
Select the icon on the home
screen to display the Entertainment screen. When selecting the desired radio, the
following icons are indicated in the lower part of the center display.
AM/FM Radio
Favorites Radio
Selected stations can be registered for convenient operation. Up to 50 ...
Mazda 6 Service Manual: Rear coil spring removal/installation
1. Remove the rear auto leveling sensor. (See REAR AUTO LEVELING SENSOR
REMOVAL/INSTALLATION.)
2. Remove in the order indicated in the table.
3. Install in the reverse order of removal.
4. Adjust the headlight zeroset. (See HEADLIGHT ZEROSET.)
5. Inspect the rear wheel alignment. (See REAR WHE ...