Mazda 6 Service Manual: Oil leakage inspection
- Use either of the following procedures to identify the type of oil that is leaking:
Using UV Light (Black Light)
1. Remove on the engine or transaxle.
Note
- Referring to the fluorescent dye instruction manual, mix the specified amount of dye into the engine oil or ATF (or transaxle oil).
2. Pour the fluorescent dye into the engine oil or ATF (or transaxle oil).
3. Allow the engine to run for 30 minutes.
4. Inspect for dye leakage by irradiating with UV light (black light), and identify the type of oil that is leaking.
5. If no dye leakage is found, allow the engine to run for another 30 minutes or drive the vehicle then reinspect.
6. Find where the oil is leaking from, then make necessary repairs.
Note
- To determine whether it is necessary to replace the oil after adding the fluorescent dye, refer to the fluorescent dye instruction manual.
Not Using UV Light (Black Light)
1. Gather some of the leaking oil using an absorbent white tissue.
2. Take samples of engine oil and ATF (or transaxle oil), both from the dipstick, and place them next to the leaked oil already gathered on the tissue.
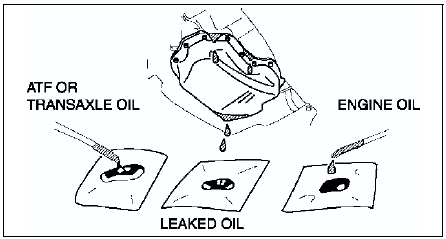
3. Compare the appearance and smell, and identify the type of oil that is leaking.
4. Remove any oil on the engine or transaxle/transmission.
5. Allow the engine to run for 30 minutes.
6. Check the area where the oil is leaking, then make necessary repairs.
 Special service tools
Use special service tools or equivalent when they are required.
...
 Disconnection of the negative battery cable
Before beginning any work, turn the ignition switch to LOCK position,
then disconnect the negative battery cable and wait for more than 1 minute
to allow the backup power supply of the SAS un ...
Other materials:
Mazda 6 Service Manual: Hazard Warning Flasher
The hazard warning lights should always be used when you stop on or near a roadway
in an emergency.
The hazard warning lights warn other drivers that your vehicle is a traffic hazard
and that they must take extreme caution when near it.
Depress the hazard warning flasher and all the turn s ...
Mazda 6 Service Manual: Center panel module disassembly/assembly
Caution
Before disassembling the center panel module, spread a cloth on the floor to
put the disassembled parts on. This protects the surface of the panel from
scratches or dirt.
1. Remove the center panel module. (See CENTER PANEL MODULE
REMOVAL/INSTALLATION.)
2. Remove in the order i ...