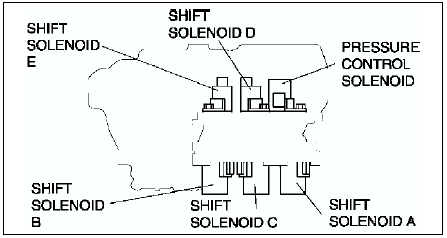
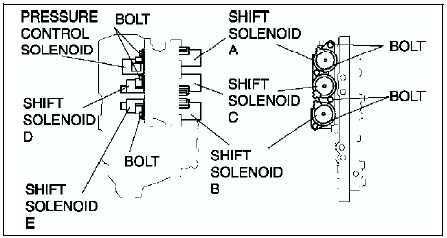
Mazda 6 Service Manual: Solenoid valve removal/installation
1. Disconnect the negative battery cable.
2. Remove the under cover.
3. Remove the control valve body. (See CONTROL VALVE BODY REMOVAL.)
4. Remove the solenoid valve(s).

5. Apply ATF to a new O-ring and install it on the solenoid valve.
6. Install the solenoid valve in the control valve body.
Tightening torque 7.8-10.8 N·m
{80-110 kgf·cm, 70-95.4 in·lbf}

7. Install the control valve body. (See CONTROL VALVE BODY REMOVAL.)
8. Install the under cover.
9. Connect the negative battery cable.
10. Add ATF and, with the engine idling, inspect the ATF level and inspect for leakage. (See Automatic Transaxle Fluid (ATF) Level Inspection.)
11. Carry out the mechanical system test. (See MECHANICAL SYSTEM TEST.)
12. Carry out the road test. (See ROAD TEST.)
 Solenoid valve inspection
Resistance Inspection (On-Vehicle Inspection)
Caution
Water or foreign objects entering the connector can cause a poor
connection or corrosion. Be sure not to drop water or foreign objects on ...
 Pcm inspection
Inspect the PCM. (See PCM INSPECTION.) ...
Other materials:
Mazda 6 Service Manual: Throttle position (tp) sensor inspection
Note
Perform the following inspection only when directed.
Resistance Inspection
1. Perform the following test only when directed.
If as specified but TP PID value is out of specification, inspect
resistance of TP sensor.
If not as specified, inspect the following:
- Accelerato ...
Mazda 6 Service Manual: Snow Tires
Use snow tires on all four wheels
Do not go faster than 120 km/h (75 mph) while driving with snow tires. Inflate
snow tires 30 kPa (0.3 kgf/cm2, 4.3 psi) more than recommended on the tire pressure
label (driver's door frame), but never more than the maximum cold-tire pressure
shown on the tir ...
