
Mazda 6 Owners Manual: Viewing the Display
Guide lines which indicate the width of the vehicle (yellow) are displayed on the screen as a reference to the approximate width of the vehicle in comparison to the width of the parking space you are about to back into.
Use this display view for parking your vehicle in a parking space or garage.
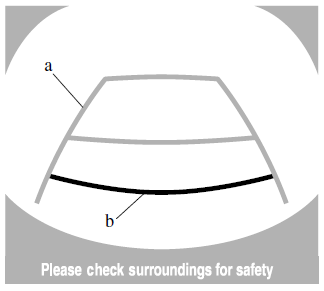
a) Vehicle width guide lines (yellow)
These guide lines serve as a reference to the approximate width of the vehicle.
b) Distance guide lines.
These guide lines indicate the approximate distance to a point measured from the vehicle's rear (from the end of the bumper).
- The red and yellow lines indicate the points about 50 cm (19 in) for the red line and 100 cm (39.3 in) for the yellow lines from the rear bumper (at the center point of each of the lines).
CAUTION
The guide lines on the screen are fixed lines. They are not synced to the driver's turning of the steering wheel. Always be careful and check the area to the vehicle's rear and the surrounding area directly with your eyes while backing up.
 Displayable Range on the Screen
The images on the screen may be different from the actual conditions.
NOTE
The displayable range varies depending on the vehicle and road conditions.
The displayable range is limited. Objects ...
 Rear View Monitor Operation
The operation of the rear view monitor when reversing the vehicle varies depending
on the traffic, road, and vehicle conditions. The amount of steering and the timing
also varies depending on cond ...
Other materials:
Mazda 6 Owners Manual: Front Seat Belt Pretensioner and Load Limiting Systems
For optimum protection, the driver and front passenger seat belts are equipped
with pretensioner and load limiting systems. For both these systems to work properly
you must wear the seat belt properly.
Pretensioners:
When a collision is detected, the pretensioners deploy simultaneously with th ...
Mazda 6 Owners Manual: Rear door garnish installation
Note
Double-sided adhesive tape has already been attached to the new
rear door garnish.
Warning
Using a razor with bare hands can cause injury. Always wear gloves
when using a razor.
1. When installing a new rear door garnish, follow the procedure below:
(1) Remove the adhesi ...