Mazda 6 Service Manual: Dashboard removal/installation
1. Disconnect the negative battery cable.
2. Remove the glove compartment.
3. Remove the console.
4. Remove the meter hood.
5. Remove the instrument cluster.
6. Remove the column cover.
7. Remove the lower panel.
8. Remove the steering shaft.
9. Remove the A-pillar trims.
10. Remove the front scuff plates.
11. Remove the front side trims.
12. Remove the side panels.
13. For vehicles equipped with the wire-type climate control unit, disconnect the wires for the front A/C unit. (See to CLIMATE CONTROL UNIT REMOVAL.) (See to CLIMATE CONTROL UNIT INSTALLATION.)
14. Disconnect the dashboard harness connectors.
15. Remove the bolts.
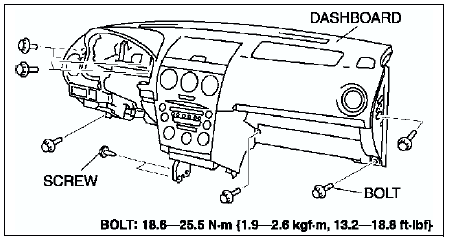
Warning
- Removing the dashboard without supporting it can be dangerous. The dashboard may fall and injure you. Always perform these procedures together with at least another person.
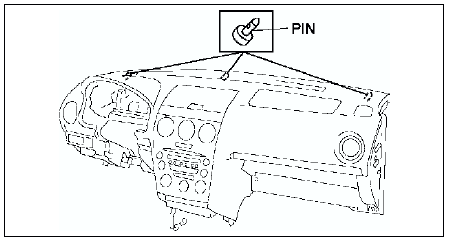
16. Pull out the support pins from the body to remove the dashboard.
17. Take the dashboard off from the driver-side door opening.
18. Install in the reverse order of removal.

 Dashboard disassembly/assembly
1. Remove the passenger-side air bag module.
2. Remove the ventilator grilles.
3. Remove the audio unit.
4. Remove the climate control unit.
5. Disassemble in the order indicated in the table.
6. ...
Other materials:
Mazda 6 Service Manual: Aluminum Wheel Maintenance
A protective coating is provided over the aluminum wheels. Special care is needed
to protect this coating.
CAUTION
Do not use any detergent other than mild detergent. Before using any detergent,
verify the ingredients. Otherwise, the product could discolor or stain the aluminum
wheels.
NOTE ...
Mazda 6 Service Manual: Engine Exhaust (Carbon monoxide)
WARNING
Do not drive your vehicle if you smell exhaust gas inside the vehicle:
Engine exhaust gas is dangerous. This gas contains carbon monoxide (CO), which is
colorless, odorless, and poisonous. When inhaled, it can cause loss of consciousness
and death. If you smell exhaust gas inside the ...