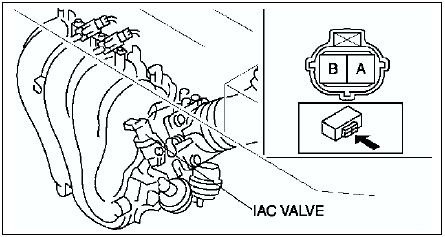
Mazda 6 Service Manual: Idle air control (iac) valve inspection
Note
- Perform the following inspection only when directed.
Operation Test
Carry out the Idle Air Control Inspection. (See Idle Air Control System Inspection.)
- If not as specified, perform the further inspection for the IAC valve.
Resistance Inspection
1. Disconnect the negative battery cable.
2. Disconnect the IAC valve connector.
3. Measure the resistance between the IAC valve terminals using an ohmmeter.
- If not as specified, replace the IAC valve. (See INTAKE-AIR SYSTEM REMOVAL/INSTALLATION.)
- If as specified but the Operation Test is failed, carry out the Circuit Open/Short Inspection.
Specification

Circuit Open/Short Inspection
1. Disconnect the PCM connector. (See PCM REMOVAL/INSTALLATION.)

2. Inspect the following wiring harnesses for open or short (continuity check).
Open circuit
- If there is no continuity, the circuit is open. Repair or replace the harness.
- IAC valve terminal A (harness-side) and PCM terminal 4G
- IAC valve terminal B (harness-side) and PCM terminal 4J
Short circuit
- If there is continuity, the circuit is shorted. Repair or replace the harness.
- IAC valve terminal A (harness-side) and power supply
- IAC valve terminal A (harness-side) and GND
- IAC valve terminal B (harness-side) and power supply
- IAC valve terminal B (harness-side) and GND
 Variable air duct (vad) check valve (one-way) inspection (l3)
1. Remove the VAD check valve (one-way). (See INTAKE-AIR SYSTEM
REMOVAL/INSTALLATION)
2. Blow through A and verify that air flows from B.
3. Blow through B and verify that air does not flow from A ...
 Variable intake-air system (vis) shutter valve actuator inspection (l3)
1. Remove the air hose. (See INTAKE-AIR SYSTEM REMOVAL/INSTALLATION.)
2. Disconnect the vacuum hose from the VIS shutter valve actuator.
3. Connect a vacuum pump to the VIS shutter valve actuator. ...
Other materials:
Mazda 6 Service Manual: Rear washer hose removal/installation
1. Disconnect the negative battery cable.
2. Remove the washer tank. (See WASHER TANK REMOVAL/INSTALLATION)
3. Partially peel off the right side mud guard.
4. Remove rear washer hose No.1 from the clips.
5. Remove rear washer hose No.1 and joint pipe A.
6. Remove the A-pillar trim. (See A-PIL ...
