Mazda 6 Service Manual: Oil cooler flushing
Note
- The contaminated cooler line (oil pipes and hoses) and auxiliary cooler must be flushed completely when ATX is overhauled or replaced.
1. Remove the two oil cooler line hoses and apply air pressure of 196 kPa {2.0 kgf/cm2, 28 psi}
from the return hose (pipe) side.
Caution
- Power flushing should be performed very carefully when removing the accumulated debris from the fluid baffle, otherwise the debris cannot be removed or the problem becomes even worse.
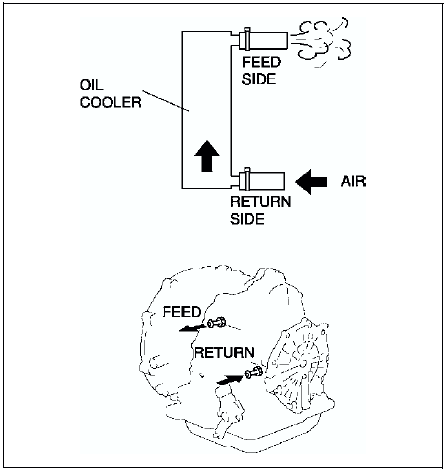
2. If there is no air blown out the feed side, flush the oil cooler lines using the power-flushing tool. (See Power Flushing)
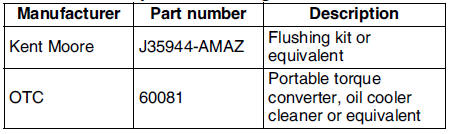
Recommended power-flushing manufacturer
3. If there is ventilation, carry out the following steps.
(1) Remove the oil pan and inspect the fluid filter element from the front filter.

(2) If the element is covered with too much debris or particles and cannot be seen, replace the oil cooler. (See OIL COOLER REMOVAL/INSTALLATION.) (See OIL COOLER DISASSEMBLY/ASSEMBLY.)
(3) If the element can be seen, flush the oil cooler lines using the power-flushing tool.
- Performing back and reverse power flushing two times each does not work because debris or particles
Power Flushing
Repair procedure
1. Before power flushing, inspect the hoses/lines and clamps. Power flushing must begin with back flushing followed by forward flushing to quickly dislodge the restriction. If back flushing is not performed before forward flushing, the restriction could further reduce the ATF flow through the internal mesh type baffle of the cooler and flushing will not be effective or possible.
Inspecting oil lines and clamps
1. Be sure to inspect the lines (hoses/pipes) for cuts, crimps (pinched), cracks or any other damage before reusing them.
- If any problems exist, replace lines and clamps.
Caution
- Always use new clamps when replacing hoses.
Back flushing
1. Using the power flushing equipment manufacturer's instructions, connect equipment so the flushing fluid flows in the opposite direction of normal fluid flow.
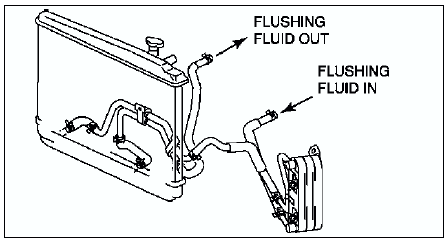
2. Flush oil cooler/lines until discharge fluid is clean.
Caution
- If the cooler can not be properly flushed using recommended equipment, send the radiator out for sublet cleaning or replace.
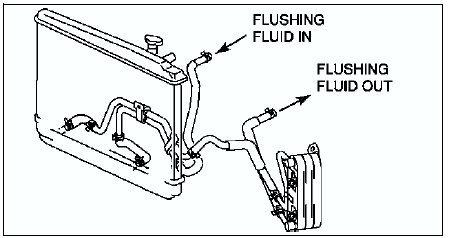
Forward flushing
1. Connect power flushing equipment so the flushing fluid flows in the direction of normal fluid flow.
2. Flush oil cooler/lines until discharge fluid is clean.
 Control valve body installation
On-Vehicle Installation
Caution
Be sure to align the parking rod and the manual valve.
1. Install the accumulator springs and accumulators into the transaxle case.
2. Install the contro ...
 Oil cooler removal/installation
1. Disconnect the negative battery cable.
2. Drain the ATF into a container. (See AUTOMATIC TRANSAXLE FLUID (ATF)
REPLACEMENT.)
3. Remove the radiator. (See RADIATOR REMOVAL/INSTALLATION.)
4. Rem ...
Other materials:
Mazda 6 Service Manual: Caliper (front) disassembly/assembly
1. Disassemble in the order indicated in the table.
2. Assemble in the reverse order of removal.
Piston Disassembly Note
Caution
Blow the compressed air slowly to prevent the piston from suddenly
popping out.
1. Place a piece of wood in the caliper, then blow compressed air through ...
Mazda 6 Service Manual: Diagnostic trouble code number inspection
1. Remove the glove compartment.
2. Short the A/C check connector to the GND terminal using a jumper wire.
3. Shine a 60 W incandescent light from a height of approximately
100 mm {3.9 in} onto the solar radiation sensor.
Note
When incandescent light does not shine on the solar radiatio ...