Mazda 6 Service Manual: Solenoid valve inspection
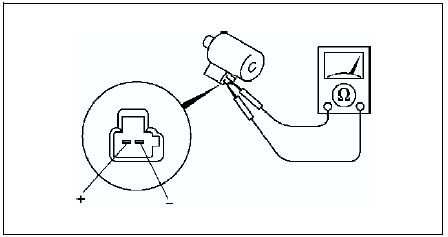
Resistance Inspection (On-Vehicle Inspection)
Caution
- Water or foreign objects entering the connector can cause a poor connection or corrosion. Be sure not to drop water or foreign objects on the connector when disconnecting it.
1. Disconnect the negative battery cable.
2. Remove the air cleaner component. (See INTAKE-AIR SYSTEM REMOVAL/INSTALLATION.)
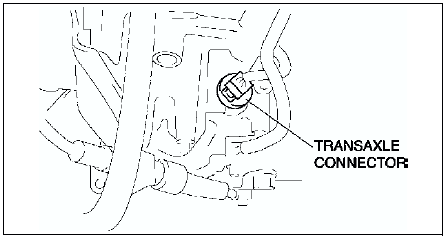
3. Disconnect the transaxle connector.
Note
- When inspecting the pressure control solenoid, connect the ground connection to the ground terminal (terminal I) of the pressure control solenoid inside the solenoid valve connector.
4. Measure the resistance between the following terminals.
- If not as specified, inspect the ground, then perform the operating inspection.
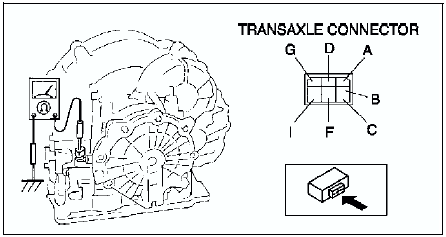
ATF temperature: -40-150 °C {-40-302 ° F}
5. Connect the transaxle connector.
6. Install the air cleaner component. (See INTAKE-AIR SYSTEM REMOVAL/INSTALLATION.)
7. Connect the negative battery cable.
Operating Inspection
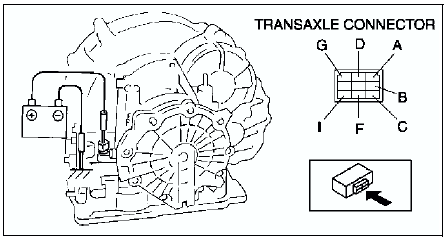
1. Disconnect the transaxle connector.
Caution
- Do not apply battery position voltage to terminals A, B, C, D, F and G for more than three seconds.
Note
- Because the operation sound of the valves is small, perform inspection in a quiet place.
2. Apply battery positive voltage to terminals A,B,C, F or G and battery negative voltage to GND, and verify that operating sound is heard from solenoid.
- If the "click" is not heard, inspect the transaxle harness.
- If the transaxle harness is okay, perform the resistance inspection (off-vehicle inspection).
- If there is a problem, repair or replace the transaxle harness.
3. Apply battery positive voltage to terminal D and battery negative voltage to terminal I, and verify that operating sound is heard from solenoid.
- If the "click" is not heard, inspect the transaxle harness.
- If transaxle harness is okay, perform the resistance inspection (off-vehicle inspection)
- If there is a problem, repair or replace the transaxle harness.
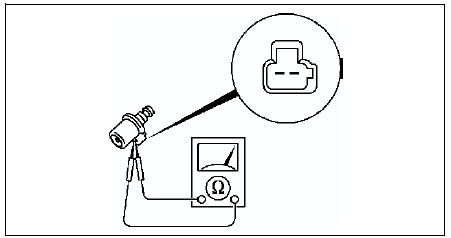
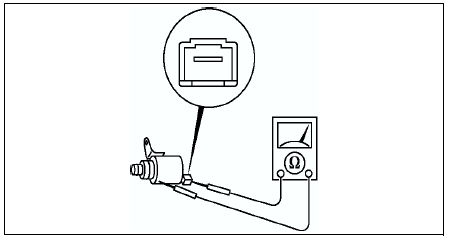
Resistance Inspection (Off-Vehicle Inspection)
1. Remove the control valve body. (See SOLENOID VALVE REMOVAL/INSTALLATION.)
2. Measure the resistance of each solenoid valve individually.
- If not as specified, replace the solenoid valve.
3. Install the control valve body. (See SOLENOID VALVE REMOVAL/INSTALLATION.)
Pressure control solenoid
Resistance
2.4-7.3 ohms
(ATF temperature: -40-150 ° C {-40-302 °F})
Shift solenoid A, B, C
Resistance
1.0-4.2 ohms
(ATF temperature: -40-150 ° C {-40-302 °F})
Shift solenoid D, E
Resistance
10.9-26.2 ohms
(ATF temperature: -40-150 ° C {-40-302 °F})
 Vehicle speedometer sensor (vss) removal/installation
Caution
Water or foreign objects entering the connector can cause a poor
connection or corrosion. Be sure not to drop water or foreign objects on the
connector when disconnecting it.
If fo ...
 Solenoid valve removal/installation
1. Disconnect the negative battery cable.
2. Remove the under cover.
3. Remove the control valve body. (See CONTROL VALVE BODY REMOVAL.)
4. Remove the solenoid valve(s).
5. Apply ATF to a new O- ...
Other materials:
Mazda 6 Service Manual: Pcm removal/installation
Note
For replace the PCM, Setup the WDS and perform the PCM
configuration. (See PCM CONFIGURATION.)
1. Disconnect the negative battery cable.
2. For R.H.D, perform the following procedures.
(1) Remove the front side trim (left-side).
(2) Partially peel back the flower covering.
3 ...
Mazda 6 Service Manual: Operating Tips for AAC
AAC stands for Advanced Audio Coding, which is standardized voice compression
established by the ISO*1 working group (MPEG). Audio data can be created and stored
at a higher compression ratio than MP3.
This unit plays files with the extensions (.aac/.m4a/.wav) as the AAC files.
*1 Internationa ...