Mazda 6 Service Manual: Valve clearance inspection
1. Disconnect the negative battery cable.
2. Remove the tire (RH).
3. Remove the splash shield (RH).
4. Remove the spark plugs. (See SPARK PLUG REMOVAL/INSTALLATION.)
5. Remove the high-tension lead.
6. Remove the oil control valve (OCV) connector.
7. Remove the ventilation hose.
8. Remove the cylinder head cover.
9. Verify that the engine is in cold condition.
10. Measure the valve clearance.
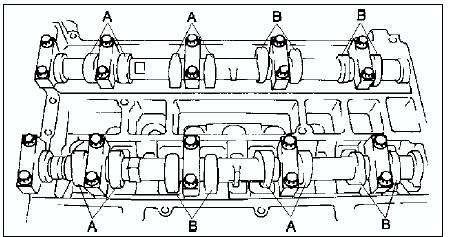
(1) Turn the crankshaft clockwise so that the No.1 piston is at TDC of the compression stroke.
(2) Measure the valve clearance at A in the figure.
- If the valve clearance exceeds the space the tappet. (See VALVE CLEARANCE ADJUSTMENT.)
Note
- Make sure to note the measured values for choosing the suitable replacement tappets.
Standard [Engine cold] IN: 0.22-0.28 mm {0.0087-0.0110 in} (0.25±0.03 mm {0.0098±0.0011 in})
EX: 0.27-0.33 mm {0.0106-0.0130 in} (0.30±0.03 mm {0.0118±0.0011 in})
(3) Turn the crankshaft 360°
clockwise so that the No.4 piston is at TDC of the compression stroke.
(4) Measure the valve clearance at B in the figure.
- If the valve clearance exceeds the standard, replace the tappet. (See VALVE CLEARANCE ADJUSTMENT.)
Note
- Make sure to note the measured values for choosing the suitable replacement tappets.
Standard [Engine cold] IN: 0.22-0.28 mm {0.0087-0.0110 in} (0.25±0.03 mm {0.0098±0.0011 in})
EX: 0.27-0.33 mm {0.0106-0.0130 in} (0.30±0.03 mm {0.0118±0.0011 in})
11. Install the cylinder head cover. (See Cylinder Head Cover Installation Note.)
12. Install the ventilation hose.
13. Install the oil control valve connector.
14. Install the high-tension lead. (See HIGH-TENSION LEAD REMOVAL/INSTALLATION.)
15. Install the spark plugs. (See SPARK PLUG REMOVAL/INSTALLATION.)
16. Install the splash shield (RH).
17. Install the tire (RH).
 Valve clearance
...
 Valve clearance adjustment
1. Disconnect the negative battery cable.
2. Remove the tire (RH).
3. Remove the splash shield (RH).
4. Remove the spark plugs. (See SPARK PLUG REMOVAL/INSTALLATION.)
5. Remove the high-tension le ...
Other materials:
Mazda 6 Service Manual: Inside Trunk Release Lever (Some models)
Your vehicle is equipped with an inside trunk release lever that provides a means
of escape for children and adults in the event they become locked inside the trunk.
No matter how careful adults might be with keys and locking their cars, parents
should be aware that children may be tempted to p ...
Mazda 6 Service Manual: Range of topics
This manual contains procedures for performing all required service
operations. The procedures are divided into the following five basic
operations:
Removal/Installation
Disassembly/Assembly
Replacement
Inspection
Adjustment
Simple operations which can be perf ...