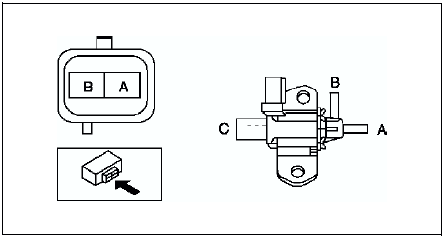
Mazda 6 Service Manual: Variable intake-air system (vis) control solenoid valve inspection (l3)
1. Remove the VIS control solenoid valve. (See INTAKE-AIR SYSTEM REMOVAL/INSTALLATION.)
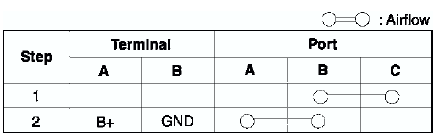
2. Inspect airflow between the ports under the following conditions.
- If not as specified, replace the VIS control solenoid valve.
- If as specified, carry out the Circuit Open/Short Inspection.
Circuit Open/Short Inspection
1. Disconnect the PCM connector. (See PCM REMOVAL/INSTALLATION.)
2. Inspect the following wiring harness for open or short (continuity check).
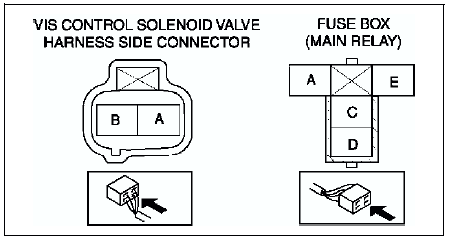
Open circuit
- If there is no continuity, the circuit is open. Repair or replace the harness.
- VIS control solenoid valve terminal A (harness-side) and PCM terminal 4R
- VIS control solenoid valve terminal B (harness-side) and main relay terminal C (harness-side)
Short circuit
- If there is continuity, the circuit is shorted. Repair or replace the harness.
- VIS control solenoid valve terminal A (harness-side) and body GND
- VIS control solenoid valve terminal B (harness-side) and power supply
 Variable intake-air system (vis) shutter valve actuator inspection (l3)
1. Remove the air hose. (See INTAKE-AIR SYSTEM REMOVAL/INSTALLATION.)
2. Disconnect the vacuum hose from the VIS shutter valve actuator.
3. Connect a vacuum pump to the VIS shutter valve actuator. ...
 Variable tumble control system (vtcs) shutter valve actuator inspection
1. Remove the air hose. (See INTAKE-AIR SYSTEM REMOVAL/INSTALLATION.)
2. Disconnect the vacuum hose from the VTCS shutter valve actuator.
3. Connect a vacuum pump to the VTCS shutter valve actuato ...
Other materials:
Mazda 6 Service Manual: Operating the Compact Disc (CD) Player
NOTE
If a disc has both music data (CD-DA) and MP3/WMA/AAC files, playback of the
two or three file types differs depending on how the disc was recorded.
Inserting the CD
Insert the CD into the slot, label-side up. The auto-loading mechanism will set
the CD and begin play.
NOTE
There wi ...
Mazda 6 Service Manual: Schedule 1
U.S.A. and Puerto Rico residents - Engine oil flexible maintenance interval
Use when the maintenance monitor for “Oil Change” is set to “Flexible”. For
details, see maintenance monitor.
Chart symbols:
I: Inspect: Inspect and clean, repair, adjust, fill up, or replace if necessary.
T: ...