Mazda 6 Service Manual: Variable valve timing actuator inspection
L3
Caution
- Variable valve timing actuator can not be disassembled it is a precision unit.
1. Disconnect the negative battery cable.
2. Remove the plug hole plate.
3. Remove the high-tension lead.
4. Remove the oil control valve connector.
5. Remove the ventilation hose.
6. Remove the cylinder head cover.
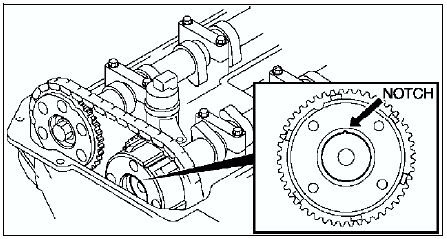
7. Confirm that notch of the rotor and bump of the cover at the variable valve timing actuator are aligned and fitted.
- If the notch and the bump are not aligned, turn the crankshaft clockwise
two rotations.
Verify that the bump and the notch are aligned.
- If the bump and notch are still not aligned, replace the variable valve timing actuator.
- If, when turning the crankshaft, there is a hitting noise from the variable valve timing actuator each time the cam passes the fully lifted position, it means that the actuator is not secured. Replace the actuator.
8. Install the cylinder head cover. (See Cylinder Head Cover Installation Note.)
9. Install the ventilation hose.
10. Install the oil control valve connector.
11. Install the high-tension lead. (See HIGH-TENSION LEAD REMOVAL/INSTALLATION.)
12. Install the spark plugs. (See SPARK PLUG REMOVAL/INSTALLATION.)
13. Installs plug hole plate.

 Variable valve timing actuator removal/installation
L3
Caution
Variable valve timing actuator can not be disassembled because it
is a precision unit.
Note
Variable valve timing actuator camshaft sprocket is integrated
with the variabl ...
Other materials:
Mazda 6 Service Manual: Headlights
Turn the headlight switch to turn the headlights and other exterior lights on
or off. When the lights are turned on, the lights-on indicator light in the instrument
cluster turns on.
NOTE
If the light switch is left on, the lights will automatically switch
off approximately 30 seconds ...
Mazda 6 Service Manual: Air bleeding
Caution
Maintain the fluid level in the reservoir tank properly while
bleeding the air.
Specified fluid
Note
The brakes should be bled whenever a brake line is disconnected.
If a hydraulic line is disconnected at the master cylinder, start at the
slave cylinder farthest from t ...