Mazda 6 Service Manual: Engine coolant
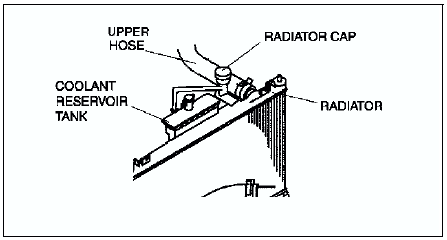
ENGINE COOLANT LEVEL INSPECTION
Verify that the coolant level in the coolant reservoir is between the F and L marks.
- If the engine coolant level is below L, remove the radiator cap and add coolant. (See COOLING SYSTEM SERVICE WARNINGS.)
ENGINE COOLANT REPLACEMENT
Warning
- Drain the engine coolant while the engine is cold, otherwise it may burn you and cause serious injury.
1. Remove the radiator cap.
2. Remove the radiator drain plug.
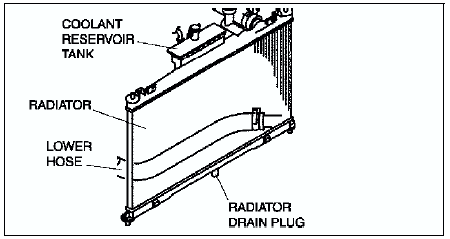
3. Drain the coolant into a container.
4. Flush the cooling system with water until all traces of color are gone.
5. Let the system drain completely.
6. Tighten the radiator drain plug.
7. Fill the coolant into the reservoir up to the FULL mark on the coolant reservoir.
8. Fully install the radiator cap.
Caution
- If the coolant temperature becomes too high, stop the engine to prevent it from overheating.
9. Start the engine and let it idle until the cooling fan operates.
10. After engine warms up, perform the following steps.
(1) Run the engine at 2,500 rpm
for 5 min.
(2) Run the engine at 3,000 rpm
for 5 s,
then return to idling.
(3) Repeat Step (2) several times.
(4) Run the engine at idle for 1 min.
11. Stop the engine and wait until it is cool.
12. Remove the radiator cap.
13. Check the coolant level.
- If It is low, repeat Steps 6-9.
14. Install the radiator cap.
15. Inspect for coolant leakage.
- If not as specified, repair or replace the radiator cap.
ENGINE COOLANT LEAKAGE INSPECTION
Warning
- Never remove the radiator cap while the engine is running, or when the engine and radiator are hot. Scalding coolant and steam may shoot out and cause serious injury. It may also damage the engine and cooling system.
- Turn off the engine and wait until it is cool. Even then, be very
careful when removing the cap.
Wrap a thick cloth around it and slowly turn it counterclockwise to the first stop. Step back while the pressure escapes.
- When you are sure all the pressure is gone, press down on the cap using the cloth, turn it, and remove it.
1. Inspect the coolant level.
2. Remove the radiator cap.
3. Clean the mounting surface of the rediator cap and the upper radiator hose.
4. Connect a radiator cap tester and the radiator cap tester
to the reservoir filler port.
5. Apply specified pressure to the radiator.
Pressure
127 kPa { 1.3 kgf/cm2, 18 psi}

6. Verify that the pressure is held.
- If not, inspect the system for coolant leakage.
- If the coolant leaks from the upper hose attachment part, replace the upper hose and the clamp.
- If the coolant leaks from the main body of the radiator (caulking part), replace the radiator.
 Cooling system service warnings
COOLING SYSTEM SERVICE WARNINGS
Warning
Never remove the radiator cap or loosen the radiator drain plug
while the engine is running, or when the engine and radiator are hot.
Scalding coolan ...
 Radiator cap
Warning
Never remove the radiator cap while the engine is running, or when
the engine and radiator are hot. Scalding coolant and steam may shoot out
and cause serious injury. It may also dam ...
Other materials:
Mazda 6 Service Manual: A/c unit removal/installation
1. Disconnect the negative battery cable.
2. Discharge the refrigerant from the system. (See RECOVERY.) (See CHARGING.)
3. Drain the engine coolant. (See ENGINE COOLANT REPLACEMENT.)
4. Remove the dashboard. (See DASHBOARD REMOVAL/INSTALLATION.)
5. Remove the theft-deterrent control module. (See ...
Mazda 6 Service Manual: Antilock Brake System (ABS)
The ABS control unit continuously monitors the speed of each wheel. If one wheel
is about to lock up, the ABS responds by automatically releasing and reapplying
that wheel's brake.
The driver will feel a slight vibration in the brake pedal and may hear a chattering
noise from the brake system ...