
Mazda 6 Owners Manual: Floor Mat
We recommend the use of Genuine Mazda floor mats.
WARNING
Make sure the floor mats are hooked on the retention pins to prevent them from bunching up under the foot pedals:
Using a floor mat that is not secured is dangerous as it will interfere with the accelerator and brake pedal operation, which could result in an accident.
Do not install two floor mats, one on top of the other, on the driver's side:
Installing two floor mats, one on top of the other, on the driver's side is dangerous as the retention pins can only keep one floor mat from sliding forward.
If using an all weather mat for winter use always remove the original floor mat.
Loose floor mat(s) will interfere with the foot pedal and could result in an accident.
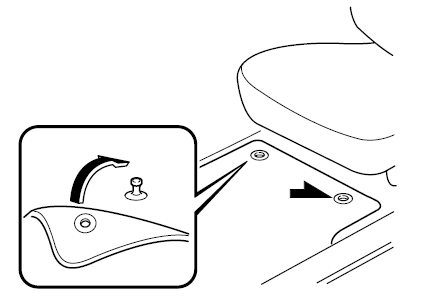
When setting a floor mat, position the floor mat so that its grommets are inserted over the pointed end of the retention posts.
 Hazardous Driving
WARNING
Be extremely careful if it is necessary to downshift on slippery surfaces:
Downshifting into lower gear while driving on slippery surfaces is dangerous. The
sudden change in tire speed co ...
 Rocking the Vehicle
WARNING
Do not spin the wheels at more than 56 km/h (35 mph), and do not allow
anyone to stand behind a wheel when pushing the vehicle: When the vehicle
is stuck, spinning the wheels at high spee ...
Other materials:
Mazda 6 Owners Manual: Noise filter inspection
Brake Light Noise Filter
1. Inspect for resistance and continuity between the noise filter terminals
using an ohmmeter.
If not as specified, replace the noise filter.
Rear Window Defroster Noise Filter
Inspect for resistance and continuity between the noise filter terminals
using an ...
Mazda 6 Owners Manual: Door adjustment
1. Measure the gap and height between the front or rear door and the body.
2. If not as specified, loosen the front or rear door hinge installation
bolts or the door lock striker installation screws, and reposition the door.
Clearance
a: 2.5-4.5 mm {0.10-0.18 in}
b: -0.8-1.2 mm {-0.03-0.0 ...