Mazda 6 Service Manual: Front door trim removal/installation
1. Disconnect the negative battery cable.
2. Open the cap using a small screwdriver, then remove the screw.
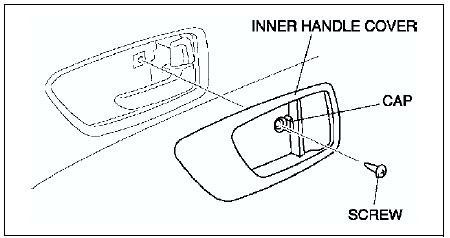
3. Remove the inner handle cover.
4. Remove the inner garnish.
5. Remove the cover, then remove screw A.
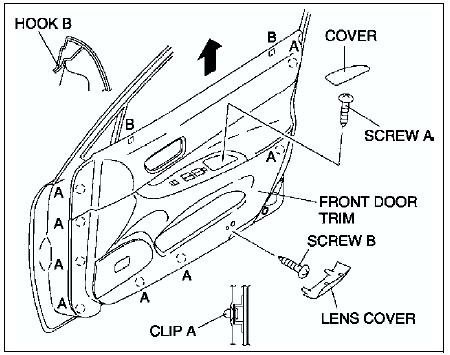
6. Remove the lens cover, then remove screw B.
7. Disengage clips A from the front door using a fastener remover.
8. Pull the front door trim upward, then disengage hooks B from the front door.
9. Disconnect the power door mirror switch connector and the power window main switch connector (drivers side) or power window subswitch connector (passengers side).
10. Remove the courtesy light.
11. Remove the front door trim.
12. Remove the switch panel from the front door trim.
13. Install in the reverse order of removal.
 C-pillar trim removal/installation
4SD
1. Remove the tire house trim.
2. Turn the seaming welt over.
3. Remove the cap using a fastener remover, and remove the bolt (with curtain
air bag system).
4. Disengage clips A and clip B ...
 Rear door trim removal/installation
1. Disconnect the negative battery cable if equipped with power window
system.
2. Remove the regulator handle if equipped.
3. Open the cap using a small screwdriver, then remove the screw.
4. R ...
Other materials:
Mazda 6 Service Manual: To Decrease Cruising Speed
Press the SET/ switch and hold
it. The vehicle will gradually slow.
Release the switch at the desired speed.
Press the SET/ switch and release
it immediately to adjust the preset speed.
Multiple operations will decrease the preset speed according to the number of
times it is operated.
Decr ...
Mazda 6 Service Manual: Shift-Lock Override
If the selector lever will not move from P using the proper shift procedure,
continue to hold down the brake pedal.
1. Remove the shift-lock override cover using a cloth-wrapped flat head screwdriver.
2. Insert a screwdriver and push it down.
3. Press and hold the lock-release button.
4. Mov ...