Mazda 6 Owners Manual: Mounting the Spare Tire
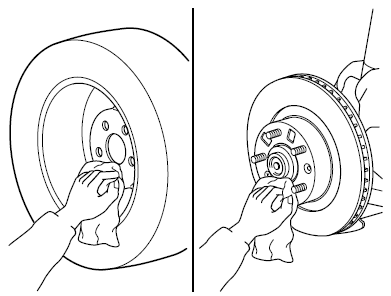
1. Remove dirt and grime from the mounting surfaces of the wheel and hub, including the hub bolts, with a cloth.
WARNING
Make sure the mounting surfaces of the wheel, hub and lug nuts are clean before changing or replacing tires:
When changing or replacing a tire, not removing dirt and grime from the mounting surfaces of the wheel, hub and hub bolts is dangerous. The lug nuts could loosen while driving and cause the tire to come off, resulting in an accident.
2. Mount the spare tire.
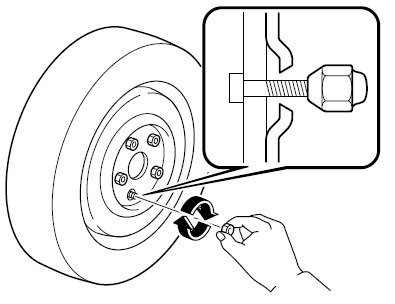
3. Install the lug nuts with the beveled edge inward; tighten them by hand.
WARNING
Do not apply oil or grease to lug nuts and bolts and do not tighten the lug nuts beyond the recommended tightening torque:
Applying oil or grease to lug nuts and bolts is dangerous. The lug nuts could loosen while driving and cause the tire to come off, resulting in an accident.
In addition, lug nuts and bolts could be damaged if tightened more than necessary.
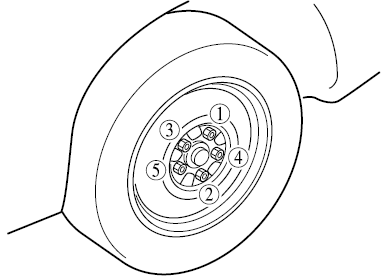
4. Turn the lug wrench counterclockwise and lower the vehicle. Use the lug wrench to tighten the nuts in the order shown.
If you are unsure of how tight the nuts should be, have them inspected at an Authorized Mazda Dealer.

WARNING
Always securely and correctly tighten the lug nuts:
Improperly or loosely tightened lug nuts are dangerous. The wheel could wobble or come off. This could result in loss of vehicle control and cause a serious accident.
Be sure to reinstall the same nuts you removed or replace them with metric nuts of the same configuration:
Because the wheel studs and lug nuts on your Mazda have metric threads, using a non-metric nut is dangerous.
On a metric stud, it would not secure the wheel and would damage the stud, which could cause the wheel to slip off and cause an accident.
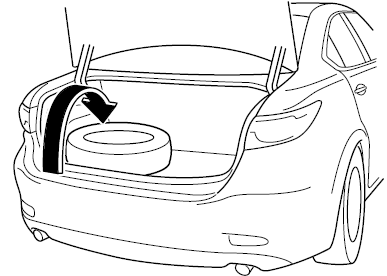
5. (Without flat tire belt)
Store the damaged tire in the trunk.
(With flat tire belt)
Open the trunk mat.
6. Remove the belt for securing the flat tire.
7. Put the flat tire into the trunk on the left and toward the back.
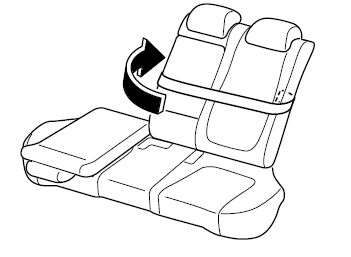
8. Fold the seat back forward on the right side of the rear seat.
9. Thread the belt through the rear seat as shown in the figure.
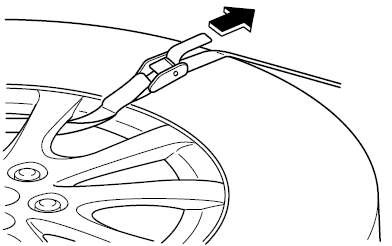
10. Thread the buckle through the wheel as shown in the figure and secure it so that the buckle does not contact the wheel.
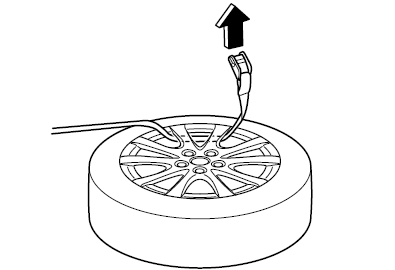
11. Thread the belt through the buckle, then pull the belt end to secure the flat tire.
12. Return the seat back on the right side of the rear seat to its original position.
13. Remove the tire blocks and store the tools and jack.
14. Check the inflation pressure.
15. Have the flat tire repaired or replaced as soon as possible.
NOTE
Do not press the tire pressure monitoring system set switch after installing the spare tire. The switch is only to be pressed after installing the repaired flat tire or installing a replacement tire
WARNING
Do not drive with any tires that have incorrect air pressure:
Driving on tires with incorrect air pressure is dangerous. Tires with incorrect pressure could affect handling and result in an accident.
When you check the regular tires' air pressure, check the spare tire, too.
NOTE
To prevent the jack and tool from rattling, store them properly.
 Locking Lug Nuts
If your vehicle has Mazda optional antitheft wheel lug nuts, one on each wheel
will lock the tires and you must use a special key to unlock them. This key will
attach to the lug wrench.
Register ...
 Battery Runs Out
Jump-Starting
Jump-starting is dangerous if done incorrectly. So follow the procedure carefully.
If you feel unsure about jump-starting, we strongly recommend that you have a competent
service te ...
Other materials:
Mazda 6 Owners Manual: Vehicle speedometer sensor removal/installation
Without ABS
1. Disconnect the negative battery cable.
2. Remove the battery and battery tray.
3. Remove the air cleaner compornent. (See INTAKE-AIR SYSTEM
REMOVAL/INSTALLATION.)
4. Disconnect the vehicle speedometer sensor connector.
5. Remove the vehicle speedometer sensor.
6. Apply transmi ...
Mazda 6 Owners Manual: Drive shaft removal/installation
Caution
Performing the following procedures without first removing the ABS
wheel-speed sensor may possibly cause an open circuit in the harness if it
is pulled by mistake. Before performing the following procedures, remove the
ABS wheel-speed sensor (axle side) and fix it to an appropri ...