Mazda 6 Service Manual: Power brake unit removal/installation
1. Remove the master cylinder. (See MASTER CYLINDER REMOVAL/INSTALLATION.)
2. Remove the wiper arm. (See WINDSHIELD WIPER ARM AND BLADE REMOVAL/INSTALLATION.)
3. Remove the cowl grille. (See COWL GRILLE REMOVAL/INSTALLATION.)
4. Remove the wiper motor. (See WINDSHIELD WIPER MOTOR REMOVAL/INSTALLATION.)
5. Remove the cowl panel. (See COWL PANEL REMOVAL/INSTALLATION.)
6. For L.H.D., remove the A/C bracket.
7. For L.H.D., remove the ABS/TCS HU/CM or DSC HU/CM . (See ABS (ABS/TCS) HU/CM REMOVAL/ INSTALLATION.) (See DSC HU/CM REMOVAL/INSTALLATION.)
8. For R.H.D., remove the alternator cover.
9. For R.H.D., remove the insulator.
10. For R.H.D., remove the vacuum pipe bracket.
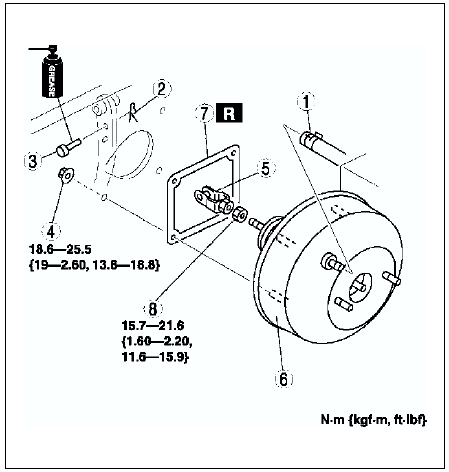
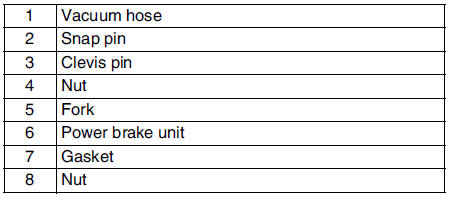
11. Remove in the order indicated in the table.


12. Install in the reverse order of removal.
 Master cylinder disassembly/assembly
Caution
If the master cylinder body is damaged, replace the unit as a
component. When securing the master cylinder in a vise, tighten only the
flange of the master cylinder.
1. Disassembl ...
 Power brake unit inspection
Warning
The following inspection methods are the simple inspection methods
to judge the function of power brake.
If there is malfunction in power brake unit, replace the power
brake unit a ...
Other materials:
Mazda 6 Service Manual: Opening the Hood
1. With the vehicle parked, pull the release handle to unlock the hood.
2. Insert your hand into the hood opening, slide the latch lever to the right,
and lift up the hood.
NOTE
The lever is located a little to the left of center when facing the vehicle.
3. Grasp the support rod in the pad ...
Mazda 6 Service Manual: Liftgate adjustment
1. Measure the gap and height between the liftgate and the body.
2. If not as specified, loosen the liftgate hinge installation bolts or the
liftgate striker installation screws, and reposition the liftgate.
Clearance
a: 3.0-7.0 mm {0.12-0.28 in}
b: -1.0-3.4 mm {-0.04-013 in}
c: 2.8-5.2 mm ...
