Mazda 6 Owners Manual: Seat Warmer (Some models)
The front seats are electrically heated. The ignition must be switched ON.
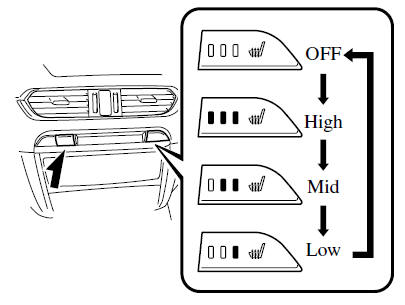
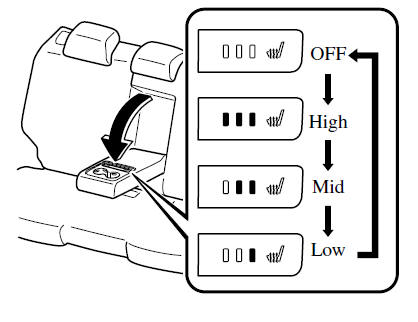
Press the seat warmer switch while the ignition is switched ON to operate the seat warmer. The indicator lights turn on to indicate that the seat warmer is operating.
The mode changes as follows each time the seat warmer switch is pressed.
Front
Rear (Some models)
WARNING
Be careful when using the seat warmer:
The heat from the seat warmer may be too hot for some people, as indicated as follows, and could cause a lowtemperature burn.
- Infants, small children, elderly people, and physically challenged people
- People with delicate skin
- People who are excessively fatigued
- People who are intoxicated
- People who have taken sleepinducing medicine such as sleeping pills or cold medicine
Do not use the seat warmer with anything having high moistureretention ability such as a blanket or cushion on the seat:
The seat may be heated excessively and cause a low-temperature burn.
Do not use the seat warmer even when taking a short nap in the vehicle:
The seat may be heated excessively and cause a low-temperature burn.
Do not place heavy objects with sharp projections on the seat, or insert needles or pins into it:
This could cause the seat to become excessively heated and result in injury from a minor burn.
CAUTION
- Before folding a rear seatback, make sure that the rear seat warmer switch is off. If a rear seatback is folded while the rear seat warmer is in operation, it may heat the seat excessively and damage the seat surface.
- Do not use organic solvents to clean the seat. It may damage the seat surface and the heater.
NOTE
- Use the seat warmer when the engine is running. Leaving the seat warmer on for long periods with the engine not running could cause the battery power to be depleted.
- (Front)
If the ignition is switched off while the seat warmer is operating (High, Mid or Low) and then switched ON again, the seat warmer will automatically operate at the temperature set before switching off the ignition.
- (Rear)
When the engine is stopped while the seat warmers are operating and then the ignition is switched ON, the seat warmers will not turn back on automatically. In addition, the seat warmer operation stops automatically after the seat warmers have operated for about 90 minutes.
To turn the seat warmer back on, press the switch.
- The temperature of the seat warmer cannot be adjusted beyond High, Mid and Low because the seat warmer is controlled by a thermostat.
 Seat Operation
1. Seat Slide
(Manual Seat)
To move a seat forward or backward, raise the lever and slide the seat to the
desired position and release the lever.
Make sure the lever returns to its original pos ...
 Driving Position Memory (Some models)
The desired driving position can be called up after programming the position.
The following driving positions can be programmed.
Driver’s seat position (seat slide, height adjustment, front edg ...
Other materials:
Mazda 6 Owners Manual: Jack
To remove the jack
1. Lift the trunk mat.
2. Remove the pocket.
3. Turn the wing bolt and jack screw counterclockwise.
To secure the jack
1. Insert the wing bolt into the jack with the jack screw pointing to the front
and turn the wing bolt clockwise to temporarily tighten it.
2. Turn ...
Mazda 6 Owners Manual: Neutral switch inspection
Note
Perform the following inspection only when directed.
Continuity Inspection
1. Disconnect the negative battery cable.
2. Remove the neutral switch.J5 MANUAL TRANSAXLE REMOVAL/INSTALLATION.)
3. Inspect for continuity between the neutral switch terminals using an
ohmmeter.
If the n ...