
Mazda 6 Service Manual: Side protector installation
1. Remove the adhesive remaining on the side protector (if it will be reused) and the body using a razor.
2. Remove any grease or dirt from the adhesion surface of the side protector (if it will be reused) and the body.
3. Attach double-sided adhesive tape to the side protector as shown (if it will be reused).
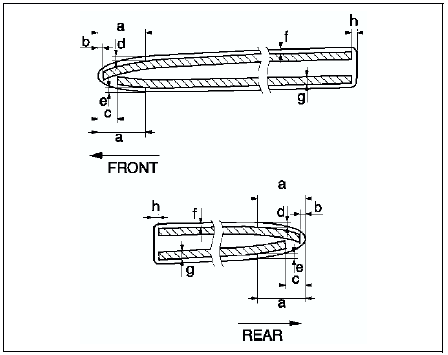
Clearancea: 30.0 mm {1.18 in}b: 3.0 mm {0.11 in}c: 12.0 mm {0.47 in}d: 3.0 mm {0.11 in}e: 3.0 mm {0.11 in}f: 1.0-3.0 mm {0.04-0.11 in}g: 5.0 mm {0.19 in}h: 2.0 mm {0.07 in}
4. Peel off the backing paper from the double-sided adhesive tape and attach the side protector onto the body as shown.
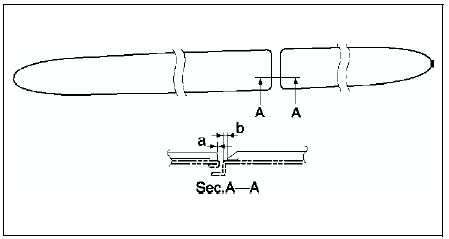
Clearance
a: 1.2-4.2 mm {0.05-0.16 in} b: 3.2-6.2 mm {0.13-0.24 in}
 Side protector removal
1. Pry the side protector end 20-30 mm {0.8-1.1 in} using a flathead
screwdriver or a razor.
Warning
Using a razor with bare hands can cause injury. Always wear gloves
when using a razor.
...
 Extractor chamber removal/installation
1. Remove the rear bumper. (See REAR BUMPER REMOVAL/INSTALLATION.)
2. Remove the left side trunk side trim.
3. Remove the screw.
4. Squeeze the clips with your fingers and remove the extractor cham ...
Other materials:
Mazda 6 Service Manual: Engine oil replacement
Warning
Hot engines and engine oil can cause severe burns. Turn off the
engine and wait until it and the engine oil has cooled.
A vehicle that is lifted but not securely supported on safety
stands is dangerous. It can slip or fall, causing death or serious injury.
Never work around or ...
Mazda 6 Service Manual: Automatic Brake Operation Display (Type A Instrument Cluster)
“Smart City Brake Support activated” is indicated in the active driving display,
and “Smart City Brake Support Activated” is indicated in the multi-information display
after the SCBS brakes or the brake assist (SCBS brake assist) is operated.
NOTE
The collision warning beep sounds ...