Mazda 6 Owners Manual: SRS Air Bag Deployment Criteria
This chart indicates the applicable SRS equipment that will deploy depending on the type of collision.
(The illustrations are the representative cases of collisions.)
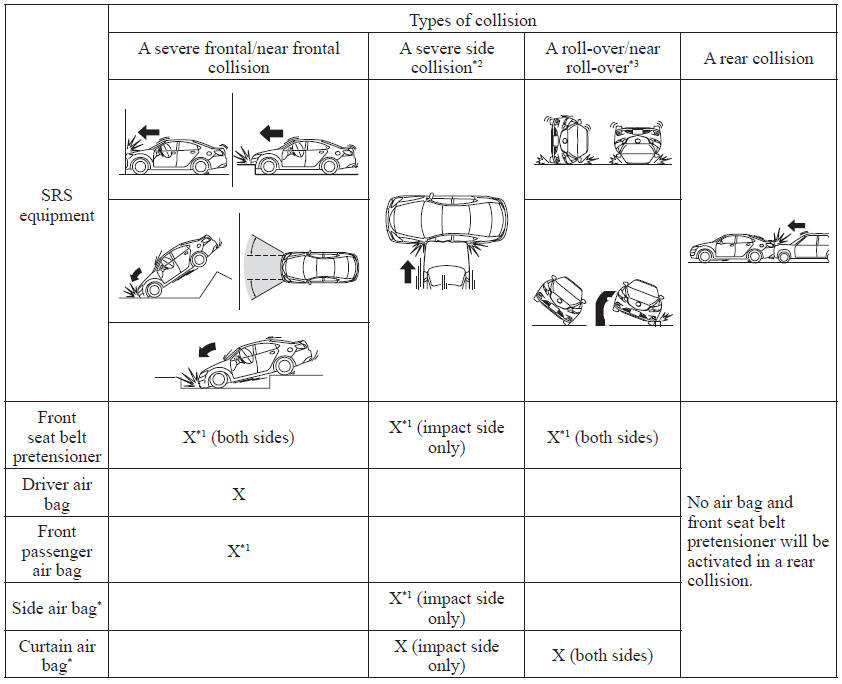
X: The SRS air bag equipment is designed to deploy in a collision.
*1 (With Front Passenger Occupant Classification System) The front passenger front and side air bags and the seat belt pretensioner are designed to deploy when the front passenger occupant classification sensor detects a passenger sitting on the front passenger's seat.
*2 (With Front Passenger Occupant Classification System) In a side collision, the seat belt pretensioners and the side/curtain air bags deploy (only on the side in which the collision occurs).
*3 (With Front Passenger Occupant Classification System) In a roll-over accident, the seat belt pretensioners and the curtain air bags deploy.
NOTE
In a frontal offset collision, the equipped air bags and pretensioners may all deploy depending on the direction, angle, and rate of impact.
 Curtain Air Bags
The curtain air bags are mounted in the front and rear window pillars, and the
roof edge along both sides.
When the air bag crash sensors detect a side impact of greater than moderate
force, the ...
 Limitations to SRS Air Bag
In severe collisions such as those described previously in "SRS Air Bag Deployment
Criteria", the applicable SRS air bag equipment will deploy. However, in some accidents,
the equipment may not de ...
Other materials:
Mazda 6 Owners Manual: Egr valve removal/installation
1. Disconnect the negative battery cable.
2. Disconnect the EGR valve connector.
3. Remove in the order indicated in the table.
4. Install in the reverse order of removal.
Water Hose Removal Note
Drain the engine coolant. (See ENGINE COOLANT REPLACEMENT.)
EGR Valve Removal Note
1. Re ...
Mazda 6 Owners Manual: Anti-theft system
Alarm Conditions
If the anti-theft system protection has been activated, any one of the
following conditions will trigger the system:
- Disconnected battery cable
- Discharged battery
- Disconnected audio unit connectors
If the system is triggered, the audio unit will then be ...