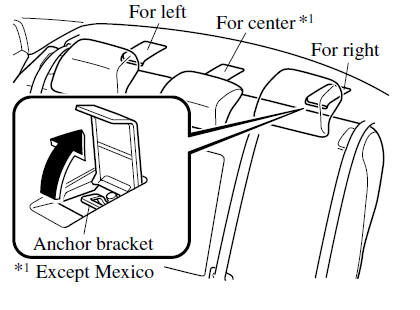
Mazda 6 Owners Manual: Anchor Bracket
Anchor brackets for securing childrestraint systems are equipped in the vehicle. Locate each anchor position using the illustration.
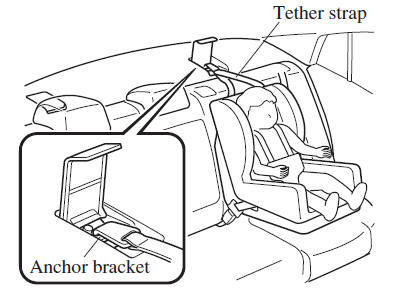
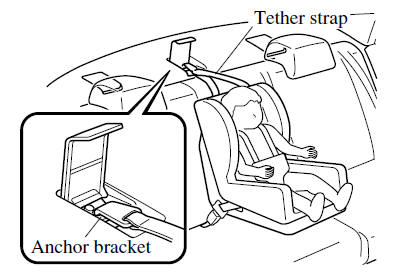
To install a child-restraint system, remove the head restraint. Always follow the instruction manual accompanying the child-restraint system.
Anchor bracket location
Use the indicated anchor bracket locations when installing a child-restraint system equipped with a tether.
WARNING
Always attach the tether strap to the correct tether anchor position:
Attaching the tether strap to the incorrect tether anchor position is dangerous. In a collision, the tether strap could come off and loosen the child-restraint system. If the childrestraint system moves it could result in death or injury to the child.
Always remove the head restraint and install child-restraint system:
Installing a child-restraint system without removing the head restraint is dangerous. The child-restraint system cannot be installed correctly which may result in death or injury to the child in a collision.
Always install the head restraint and adjust it to the appropriate position after removing the child-restraint system:
Driving with the head restraint removed is dangerous as impact to the occupant's head cannot be prevented during emergency braking or in a collision, which could result in a serious accident, injury or death. Refer to Head Restraints.
 Installing Child-Restraint Systems
Accident statistics reveal that a child is safer in the rear seat. The front
passenger's seat is clearly the worst choice for any child under 12, and with rear-facing
childrestraint systems it is ...
 Using Automatic Locking Mode (Some models)
Follow these instructions when using a child-restraint system, unless you are
attaching a LATCH-equipped childrestraint system to the rear LATCH lower anchors.
Refer to “Using LATCH Lower Anchor ...
Other materials:
Mazda 6 Owners Manual: Variable air duct (vad) shutter valve inspection (l3)
1. Remove the air cleaner case. (See INTAKE-AIR SYSTEM REMOVAL/INSTALLATION.)
2. Disconnect the vacuum hose from the VAD shutter valve actuator.
3. Connect a vacuum pump to the VAD shutter valve actuator.
4. Apply vacuum and verify that the rod moves.
If the rod dose not move, replace the a ...
Mazda 6 Owners Manual: Distance-to-empty
This displays the approximate distance you can travel on the remaining fuel based
on the fuel economy.
The distance-to-empty will be calculated and displayed every second.
NOTE
Even though the distance-to-empty display may indicate a sufficient amount
of remaining driving distance befor ...