Mazda 6 Service Manual: C-pillar trim removal/installation
4SD
1. Remove the tire house trim.
2. Turn the seaming welt over.
3. Remove the cap using a fastener remover, and remove the bolt (with curtain air bag system).
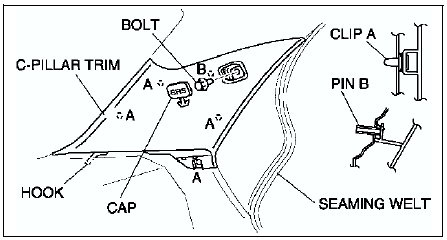
4. Disengage clips A and clip B using a fastener remover.
5. Pull the C-pillar trim forward, then disengage hook C from the body, and remove the C-pillar trim.
6. Install in the reverse order of removal.
5HB
1. Remove the tire house trim.
2. Remove the trunk side upper trim
3. Turn the seaming welt over.
4. Remove the cap using a fastener remover the bolt. (with curtain air bag system)
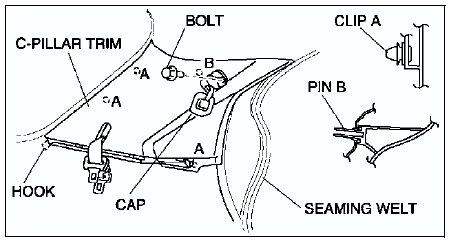
5. Disengage clips A and pin B using a fastener remover.
6. Pull the C-pillar trim forward, then disengage the hook from the body.
7. Remove the rear center seat belt tongue from the C-pillar trim. (LH only)
8. Remove the C-pillar trim.
9. Install in the reverse order of removal.
 Rear scuff plate removal/installation
1. Pull the rear scuff plate upward, then disengage clips A, pin B, and hooks
C from the body, and remove the rear scuff plate.
2. Install in the reverse order of removal. ...
 Front door trim removal/installation
1. Disconnect the negative battery cable.
2. Open the cap using a small screwdriver, then remove the screw.
3. Remove the inner handle cover.
4. Remove the inner garnish.
5. Remove the cover, th ...
Other materials:
Mazda 6 Service Manual: Driving In Flooded Area
WARNING
Dry off brakes that have become wet by driving slowly, releasing the accelerator
pedal and lightly applying the brakes several times until the brake performance
returns to normal: Driving with wet brakes is dangerous. Increased stopping
distance or the vehicle pulling to one side when ...
Mazda 6 Service Manual: Transaxle oil inspection
1. Park the vehicle on level ground.
2. Remove the oil level plug and washer.
3. Verify that the oil is near the brim of the plug port.
If the oil level is lower than the low level, add the specified amount
and type of oil through the oil level plug hole.
Specified oil grade
API Ser ...