Mazda 6 Owners Manual: Changing a Flat Tire
NOTE
If the following occurs while driving, it could indicate a flat tire.
- Steering becomes difficult.
- The vehicle begins to vibrate excessively.
- The vehicle pulls in one direction.
If you have a flat tire, drive slowly to a level spot that is well off the road and out of the way of traffic to change the tire. Stopping in traffic or on the shoulder of a busy road is dangerous.
WARNING
Be sure to follow the directions for changing a tire:
Changing a tire is dangerous if not done properly. The vehicle can slip off the jack and seriously injure someone.
No person should place any portion of their body under a vehicle that is supported by a jack.
Never allow anyone inside a vehicle supported by a jack:
Allowing someone to remain in a vehicle supported by a jack is dangerous. The occupant could cause the vehicle to fall resulting in serious injury.
NOTE
Make sure the jack is well lubricated before using it.
1. Park on a hard, level surface off the right-of-way and firmly set the parking brake.
2. Put a vehicle with an automatic transaxle in Park (P), a manual transaxle in Reverse (R) or 1, and turn off the engine.
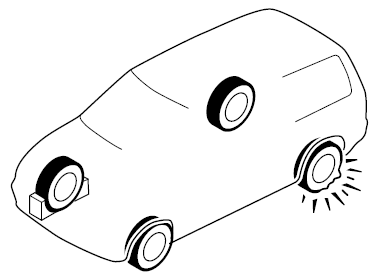
3. Turn on the hazard warning flasher.
4. Have everyone get out of the vehicle and away from the vehicle and traffic.
5. Remove the jack, tool, and spare tire.
6. Block the wheel diagonally opposite the flat tire. When blocking a wheel, place a tire block both in front and behind the tire.

NOTE
When blocking a tire, use rocks or wood blocks of sufficient size if possible to hold the tire in place.
 Spare Tire
Your Mazda has a temporary spare tire. The temporary spare tire is lighter and
smaller than a conventional tire, and is designed only for emergency use and should
be used only for VERY short perio ...
 Removing a Flat Tire
1. Loosen the lug nuts by turning them counterclockwise one turn each, but do
not remove any lug nuts until the tire has been raised off the ground.
2. Place the jack on the ground.
3. Turn the ...
Other materials:
Mazda 6 Owners Manual: Clutch switch inspection
Note
Perform the following inspection only when directed.
Continuity Inspection
1. Verify that the clutch switch is installed properly.
2. Disconnect the negative battery cable.
3. Remove the clutch switch.
4. Inspect for continuity between the clutch switch terminals using an
ohmmeter. ...
Mazda 6 Owners Manual: HomeLink Wireless Control System (Some models)
NOTE
HomeLink and HomeLink house icon are registered trademarks of Gentex Corporation.
The HomeLink system replaces up to 3 hand-held transmitters with a single built-in
component in the auto-dimming mirror. Pressing the HomeLink button on the auto-dimming
mirror activates garage doors, gates ...
