Mazda 6 Owners Manual: Locking Lug Nuts
If your vehicle has Mazda optional antitheft wheel lug nuts, one on each wheel will lock the tires and you must use a special key to unlock them. This key will attach to the lug wrench.
Register them with the lock manufacturer by filling out the card provided in the glove compartment and mailing it in the accompanying envelope. If you lose this key, consult an Authorized Mazda Dealer or use the lock manufacturer's order form, which is with the registration card.
Accessory wheel locks cannot be used on steel wheels. This includes situations when the spare tire is installed. If the spare tire is installed, one of the original lug nuts (which should still be in the vehicle) must be installed in place of the wheel lock.
To remove an antitheft lug nut
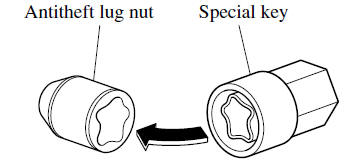
1. Obtain the special key for the antitheft lug nut.
2. Place the special key on top of the antitheft lug nut, and be sure to hold the key square to it. If you hold the key at an angle, you may damage both key and nut. Do not use a power impact wrench.
3. Place the lug wrench on top of the key and apply pressure. Turn the wrench counterclockwise.
To install the antitheft lug nut
1. Place the special key on top of the nut, and be sure to hold the key square to it. If you hold the key at an angle, you may damage both key and nut. Do not use a power impact wrench.
2. Place the lug wrench on top of the special key, apply pressure, and turn it clockwise.

 Removing a Flat Tire
1. Loosen the lug nuts by turning them counterclockwise one turn each, but do
not remove any lug nuts until the tire has been raised off the ground.
2. Place the jack on the ground.
3. Turn the ...
 Mounting the Spare Tire
1. Remove dirt and grime from the mounting surfaces of the wheel and hub, including
the hub bolts, with a cloth.
WARNING
Make sure the mounting surfaces of the wheel, hub and lug nuts are clean ...
Other materials:
Mazda 6 Owners Manual: Accessory Sockets
Only use genuine Mazda accessories or the equivalent requiring no greater than
120 W (DC 12 V, 10 A).
Front
The ignition must be switched to ACC or ON.
Center
The accessory sockets can be used regardless of whether the ignition is on or
off.
CAUTION
To prevent accessory socket damag ...
Mazda 6 Owners Manual: Power outside mirror inspection
1. Disconnect the power outside mirror connector.
2. Apply battery positive voltage to the power outside mirror terminals and
inspect the operation of the power outside mirror.
If not as specified, replace the power outside mirror.
3. Inspect for continuity between the power outside mi ...