Mazda 6 Service Manual: Crankshaft position (ckp) sensor removal/installation
Removal
1. Perform the following procedure to making the working space.
(1) Remove the Front wheel (RH).
(2) Remove the splash shield.
2. Disconnect the CKP sensor connector.
3. Remove the installation bolts to remove the CKP sensor.
Installation
Caution
- When foreign material such as an iron chip is on the CKP sensor, it can cause abnormal output from the sensor because of flux turbulence and adversely affect the engine control. Be sure there is no foreign material on the CKP sensor when replacing.
1. Perform the following procedure so that piston No.1 is at the top dead center.
(1) Remove the front driveshaft (RH). (See DRIVE SHAFT REMOVAL/INSTALLATION.)
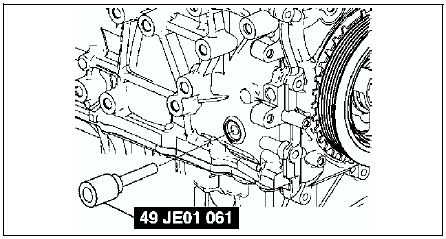
(2) Remove the cylinder block lower blind plug and install the SST
.

(3) Turn the crankshaft pulley to the clockwise until it stops.
2. Install the CKP sensor to the CKP sensor installer.
3. Fit the forked part of the CKP sensor installer with the ninth tooth (counting counterclockwise from the empty space) of the pulse wheel.
4. Install the CKP sensor fitting bolts.
Tightening torque 5.5-7.5 N·m {56-76 kgf·cm, 4.1-5.5 ft·lbf}
5. Remove the CKP sensor installer
6. Remove the SST
then install the cylinder block lower blind plug.
Tightening torque 20 N·m {2.0 kgf·m, 15 ft·lbf}
7. Install the front driveshaft (RH). (See DRIVE SHAFT REMOVAL/INSTALLATION.)
 Crankshaft position (ckp) sensor inspection
Note
Perform the following inspection only when directed.
Resistance Inspection
1. Disconnect the CKP sensor connector.
2. Measure the resistance between CKP sensor terminals A and B using an ...
 Camshaft position (cmp) sensor inspection
Caution
When foreign material such as an iron chip is on the CMP sensor,
it can cause abnormal output from the sensor because of flux turbulence and
adversely affect the engine control. Be s ...
Other materials:
Mazda 6 Service Manual: Interior
Front
Rear
...
Mazda 6 Service Manual: Dynamometer
When inspecting and servicing the power train on the dynamometer or
speed meter tester, pay attention to the following:
- Place a fan, preferably a vehicle-speed proportional type, in front
of the vehicle.
- Make sure the vehicle is in a facility with an exhaust gas
ventilation ...
