Mazda 6 Service Manual: Headliner removal/installation
1. Disconnect the negative battery cable.
2. Turn the seaming welt and weatherstrip over.
3. Remove the sunroof seaming welt. (vehicles with sunroof only)
4. Remove the A-pillar trims.
5. Remove the B-pillar upper trims.
6. Remove the C-pillar trims.
7. Remove the front and rear map light. (See FRONT MAP LIGHT REMOVAL/INSTALLATION.) (See REAR MAP LIGHT REMOVAL/INSTALLATION.)
8. Remove the sunvisors.
9. Remove the assist handle.
10. Disconnect the roof harness connector, remove the clip, and remove the connector.
11. Remove the fasteners.
12. Disconnect the front and rear drain hose.
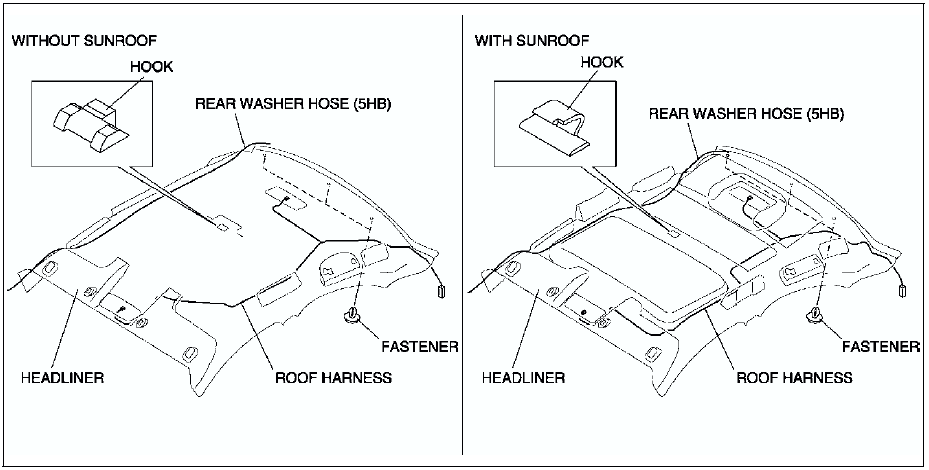
13. Disconnect the rear washer hose (5HB).
14. Remove the hook holding the roof panel and remove the headliner.
15. Take the headliner off from the passenger-side door opening.
16. Install in the reverse order of removal.
 Headliner
...
 Shock absorbing pad removal/installation
1. Remove the headliner.
2. Remove the fastener, then remove the shock absorbing pad.
3. Install in the reverse order of removal. ...
Other materials:
Mazda 6 Service Manual: To Temporarily Cancel
To temporarily cancel the system, use one of these methods:
Slightly depress the brake pedal.
(Manual transaxle) Depress the clutch pedal.
Press the OFF/CANCEL switch.
If the RESUME/ switch is
pressed when the vehicle speed is 25 km/h (16 mph) or higher, the system reverts
to the prev ...
Mazda 6 Service Manual: Trunk lid removal/installation
Warning
Removing the stay damper without supporting the trunk lid can be
dangerous. The trunk lid may fall and injure you. Open the trunk lid fully
and support it before removing the stay damper.
1. Disconnect the negative battery cable.
2. Disconnect the trunk lid harness connector, p ...