Mazda 6 Owners Manual: Outside Mirrors
WARNING
Be sure to look over your shoulder before changing lanes:
Changing lanes without taking into account the actual distance of the vehicle in the convex mirror is dangerous. You could have a serious accident. What you see in the convex mirror is closer than it appears.
Mirror type
Flat type (driver's side)
Flat surface mirror.
Convex type (front passenger side)
The mirror has single curvature on its surface.
Power mirror adjustment
The ignition must be switched to ACC or ON position.
To adjust:
1. Rotate the mirror switch to the left  or
or
right  to choose the left or right side mirror.
2. Press the mirror switch in the appropriate direction.
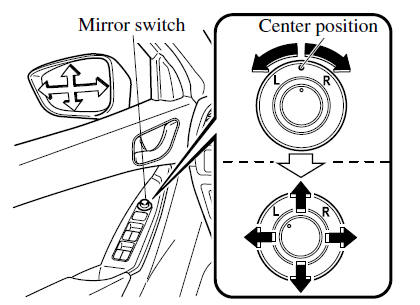
After adjusting the mirror, lock the control by rotating the switch in the center position.
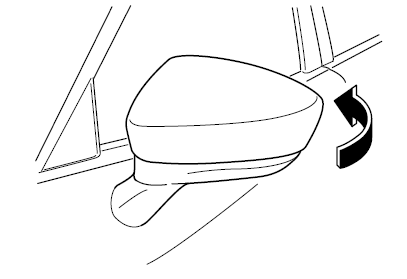
Folding mirror
WARNING
Always return the outside mirrors to the driving position before you start driving:
Driving with the outside mirrors folded in is dangerous. Your rear view will be restricted, and you could have an accident.
Manually fold the outside mirror rearward until it is flush with the vehicle.
Driver's side auto-dimming door mirror (some models)
The movement of the auto-dimming door mirror is interlocked with the autodimming rearview mirror in the interior to automatically reduce glare from rear on-coming vehicles.
Refer to Rearview Mirror.
NOTE
The front passenger-side door mirror does not have the auto-dimming feature.
 Mirrors
Before driving, adjust the inside and outside mirrors. ...
 Rearview Mirror
WARNING
Do not stack cargo or objects higher than the seatbacks: Cargo stacked
higher than the seatbacks is dangerous. It can block your view in the rearview mirror,
which might cause you to hit ...
Other materials:
Mazda 6 Owners Manual: Front stabilizer removal/installation
1. Remove the front crossmember component. (See FRONT CROSSMEMBER
REMOVAL/INSTALLATION.)
2. Remove in the order indicated in the table.
3. Install in the reverse order of removal.
4. Adjust the headlight zeroset. (See HEADLIGHT ZEROSET.)
5. Inspect the front wheel alignment. (See FRONT WHEEL A ...
Mazda 6 Owners Manual: Windshield Wipers and Washer
The ignition must be switched ON to use the wipers.
WARNING
Use only windshield washer fluid or plain water in the reservoir:
Using radiator antifreeze as washer fluid is dangerous. If sprayed on the windshield,
it will dirty the windshield, affect your visibility, and could result in an accid ...