Mazda 6 Service Manual: Rear door lock actuator inspection
Door Lock Actuator
1. Disconnect the front door lock actuator connector.
2. Apply battery positive voltage to the front door lock actuator terminals and inspect the operation of the front door lock actuator.
- If not as specified, replace the front door lock actuator.
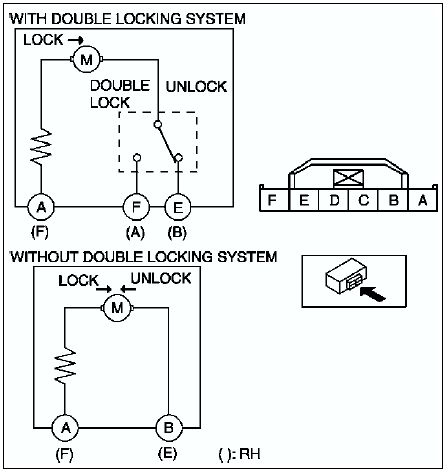
With double locking system
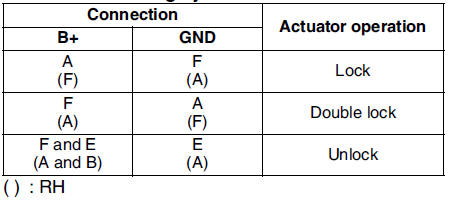
Without double locking system
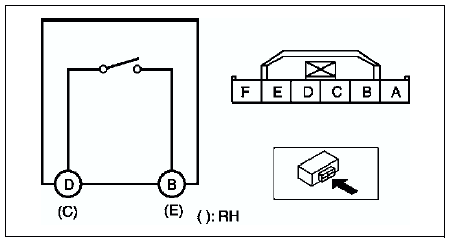
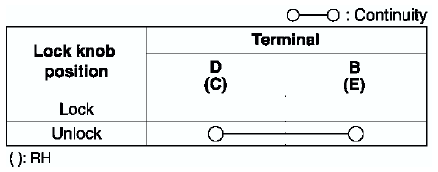
Door Lock-link Switch (With Theft-deterrent System
1. Disconnect the front door lock actuator connector.
2. Inspect for continuity between the door lock-link switch terminals using an ohmmeter.
- If not as specified, replace the front door lock actuator.
 Front door lock actuator inspection
Door Lock Actuator
1. Disconnect the front door lock actuator connector.
2. Apply battery positive voltage to the front door lock actuator terminals
and inspect the operation of the front door loc ...
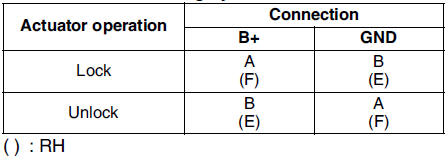
 Trunk lid lock actuator inspection
1. Disconnect the trunk lid lock actuator connector.
2. Apply battery positive voltage to the trunk lid lock actuator terminals
and inspect the operation of the trunk lid lock actuator.
If not ...
Other materials:
Mazda 6 Service Manual: Door lock timer unit removal/installation
1. Disconnect the negative battery cable.
2. Remove the glove compartment. (L.H.D.)
3. Remove the bolt.
4. While inclining the door lock timer unit along the body panel in the
direction indicated by the arrow, disengage the bracket hook from the hole in
the body panel.
5. Disconnect the do ...
Mazda 6 Service Manual: Making a Call
Phonebook Usage
Telephone calls can be made by saying the contact name in the downloaded phonebook
or the name of a person whose phone number has been registered in the Bluetooth®
Hands-Free. Refer to Import contact (Download Phonebook).
1. Press the talk button.
2. Wait for the beep sound.
...