Mazda 6 Service Manual: Shift mechanism
1. Remove the battery, battery tray and battery bracket.
2. Remove the air cleaner component. (See INTAKE-AIR SYSTEM REMOVAL/INSTALLATION.)
3. Remove the dashboard compleat. (See DASHBOARD REMOVAL/INSTALLATION.)
4. Remove the SAS control module. (See SAS UNIT REMOVAL/INSTALLATION.)
5. Remove the climate control unit. (See CLIMATE CONTROL UNIT REMOVAL.) (See CLIMATE CONTROL UNIT INSTALLATION.)
6. Remove the rear heat duct. (See REAR HEAT DUCT REMOVAL/INSTALLATION.)
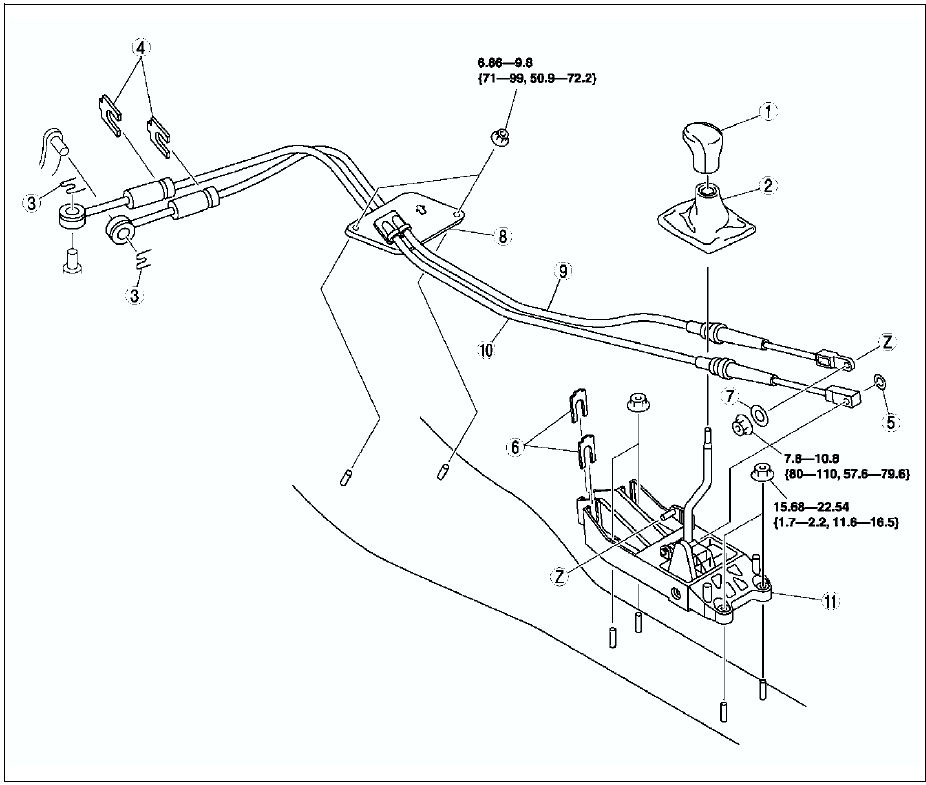
7. Remove in the order indicated in the table.
8. Install in the reverse order of removal.
9. Install the air cleaner component.
10. After installation, verify that the shift lever can be shifted smoothly into each position.


Select Cable Installation Note
1. Remove the center console.
2. Make sure that the shift lever (transaxle side) is in neutral.
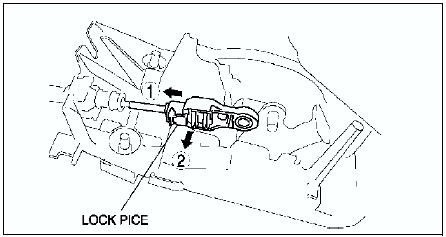
3. Unlock the lock pice of the select cable (shift lever side) in the order shown in the figure.

4. Shift the sift lever to neutral.
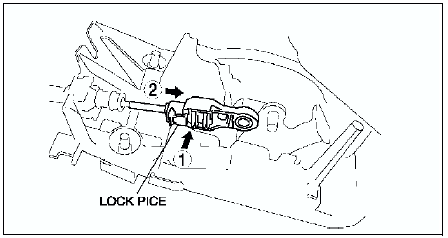
5. Lock the lock pice of the selector cable (shift cable side) in the order shown in the figure.

6. Install the center console.
7. Shift the shift lever from neutral to other position, and make sure that there are no other components in that area to interfere with the lever.
 Manual transaxle removal/installation
1. Remove the battery, battery tray and battery bracket.
2. Remove the air cleaner compornent. (See INTAKE-AIR SYSTEM
REMOVAL/INSTALLATION.)
3. Remove the wheels, tires and splash shields.
4. Rem ...
Other materials:
Mazda 6 Service Manual: Dtc c1148, c1158, c1168, c1178, c1233, c1234, c1235, c1236
Caution
When attaching the tester lead to the ABS (ABS/TCS) HU/CM harness
connector, the SST (49 G066 001) must be used. (See ABS (ABS/TCS) HU/CM
INSPECTION.)
Diagnostic procedure
...
Mazda 6 Service Manual: Caliper (front) disassembly/assembly
1. Disassemble in the order indicated in the table.
2. Assemble in the reverse order of removal.
Piston Disassembly Note
Caution
Blow the compressed air slowly to prevent the piston from suddenly
popping out.
1. Place a piece of wood in the caliper, then blow compressed air through ...

