Mazda 6 Service Manual: Solenoid valve removal/installation
1. Disconnect the negative battery cable.
2. Remove the under cover.
3. Remove the control valve body. (See CONTROL VALVE BODY REMOVAL.)
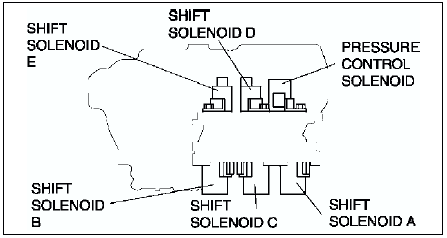
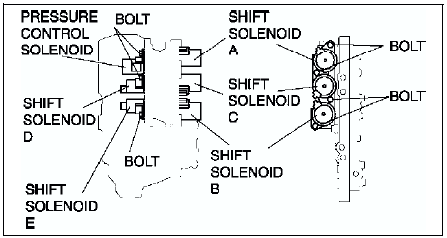
4. Remove the solenoid valve(s).
5. Apply ATF to a new O-ring and install it on the solenoid valve.
6. Install the solenoid valve in the control valve body.
Tightening torque 7.8-10.8 N·m
{80-110 kgf·cm, 70-95.4 in·lbf}
7. Install the control valve body. (See CONTROL VALVE BODY REMOVAL.)
8. Install the under cover.
9. Connect the negative battery cable.
10. Add ATF and, with the engine idling, inspect the ATF level and inspect for leakage. (See Automatic Transaxle Fluid (ATF) Level Inspection.)
11. Carry out the mechanical system test. (See MECHANICAL SYSTEM TEST.)
12. Carry out the road test. (See ROAD TEST.)
 Solenoid valve inspection
Resistance Inspection (On-Vehicle Inspection)
Caution
Water or foreign objects entering the connector can cause a poor
connection or corrosion. Be sure not to drop water or foreign objects on ...
 Pcm inspection
Inspect the PCM. (See PCM INSPECTION.) ...
Other materials:
Mazda 6 Service Manual: Oil control valve (ocv) inspection
L3
Coil Resistance Inspection
1. Disconnect the negative battery cable.
2. Disconnect the oil control valve connector.
3. Measure the resistance between terminals A and B using an ohmmeter.
If not as specified, replace the oil control valve.
Specification
6.9-7.9 ohms
4. Connect ...
Mazda 6 Service Manual: Headlight aiming
Low-beam
1. Set up a screen as shown in the figure below for aiming the headlights.
2. Adjust the tire air pressure to the specification.
3. Position the unloaded vehicle on a flat, level surface.
4. Seat one person in the driver's seat.
5. Position the vehicle straight ahead and perpendicu ...