Mazda 6 Service Manual: Variable valve timing actuator inspection
L3
Caution
- Variable valve timing actuator can not be disassembled it is a precision unit.
1. Disconnect the negative battery cable.
2. Remove the plug hole plate.
3. Remove the high-tension lead.
4. Remove the oil control valve connector.
5. Remove the ventilation hose.
6. Remove the cylinder head cover.
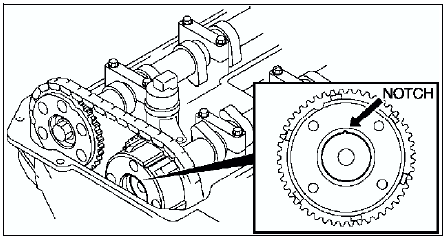
7. Confirm that notch of the rotor and bump of the cover at the variable valve timing actuator are aligned and fitted.
- If the notch and the bump are not aligned, turn the crankshaft clockwise
two rotations.
Verify that the bump and the notch are aligned.
- If the bump and notch are still not aligned, replace the variable valve timing actuator.
- If, when turning the crankshaft, there is a hitting noise from the variable valve timing actuator each time the cam passes the fully lifted position, it means that the actuator is not secured. Replace the actuator.
8. Install the cylinder head cover. (See Cylinder Head Cover Installation Note.)
9. Install the ventilation hose.
10. Install the oil control valve connector.
11. Install the high-tension lead. (See HIGH-TENSION LEAD REMOVAL/INSTALLATION.)
12. Install the spark plugs. (See SPARK PLUG REMOVAL/INSTALLATION.)
13. Installs plug hole plate.

 Variable valve timing actuator removal/installation
L3
Caution
Variable valve timing actuator can not be disassembled because it
is a precision unit.
Note
Variable valve timing actuator camshaft sprocket is integrated
with the variabl ...
Other materials:
Mazda 6 Service Manual: Rear shock absorber removal/installation
Caution
Performing the following procedures without first removing the ABS
wheel-speed sensor may possibly cause an open circuit in the harness if it
is pulled by mistake. Before performing the following procedures, remove the
ABS wheel-speed sensor (axle side) and fix it to an appropri ...
Mazda 6 Service Manual: Purge solenoid valve removal/installation
1. Disconnect the negative battery cable.
2. Remove in the order indicated in the table.
3. Install in the reverse order of removal.
Vacuum Hose Installation Note
Attach the vacuum hose onto the purge solenoid valve until it contacts the
stopper.
Evaporative Hose Installation Note
Attach ...