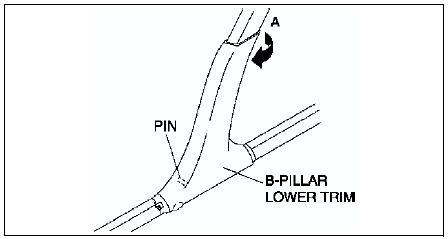
Mazda 6 Service Manual: B-pillar lower trim removal/installation
1. Remove the front scuff plate.
2. Remove the rear scuff plate.
3. Pull the area marked A, then remove one side of the B-pillar lower trim.

4. Pull the B-pillar lower trim, then remove the pin from the body.
5. Remove the B-pillar lower trim.
6. Install in the reverse order of removal.
 A-pillar trim installation
1. Cut A-pillar trim tab A to the same length as tab B.
2. Install clip B to the A-pillar trim.
3. Install the A-pillar trim by tapping the clip into the body. ...
 B-pillar upper trim removal/installation
1. Remove the upper anchor of the front seat belt.
2. Remove the B-pillar lower trim.
3. Turn the seaming welt over.
4. Pull the B-pillar upper trim toward you, then disengage, clip B, and pin C ...
Other materials:
Mazda 6 Service Manual: Information display removal/installation
1. Disconnect the negative battery cable.
2. Remove the center panel module. (See CENTER PANEL MODULE
REMOVAL/INSTALLATION.)
3. Remove the LCD unit. (with car-navigation system) (See LCD UNIT
REMOVAL/INSTALLATION.)
4. Remove the center box. (without car-navigation system)
5. Remove in the or ...
Mazda 6 Service Manual: STEP 3: Contact Better Business Bureau (BBB)
Mazda North American Operations realizes that mutual agreement on some issues
may not be possible. As a final step to ensure that your concerns are being fairly
considered, Mazda North American Operations has agreed to participate in a dispute
settlement program administered by the Better Busi ...
