Mazda 6 Service Manual: Front lower arm (rear) inspection
1. Remove the lower arm (rear) from the vehicle.
2. Inspect for damage, cracks, and bending.
3. Inspect the ball joint rotation torque.
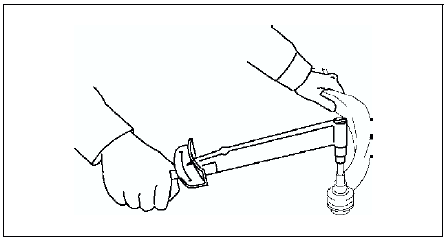
(1) Rotate the ball joint five times.
(2) Measure the rotation torque using a suitable allen socket and a torque wrench.
- If not within the specification, replace the lower arm component.
Rotation torque
1.00-2.22 N·m
{10.2-22.6 kgf·cm, 8.86-19.6 in·lbf}
 Front lower arm (rear) removal/installation
1. Remove the front crossmember component. (See FRONT CROSSMEMBER
REMOVAL/INSTALLATION.)
2. Remove in the order indicated in the table.
3. Install in the reverse order of removal.
4. Inspect the ...
 Front stabilizer removal/installation
1. Remove the front crossmember component. (See FRONT CROSSMEMBER
REMOVAL/INSTALLATION.)
2. Remove in the order indicated in the table.
3. Install in the reverse order of removal.
4. Adjust the h ...
Other materials:
Mazda 6 Service Manual: Combine sensor removal/installation
Caution
Be careful and do not allow the combine sensor to fall. If by
chance it is subjected to strong impact, replace it.
1. Remove the center console.
2. Remove in the order indicated in the table.
3. Install in the reverse order of removal.
4. After installation, perform the comb ...
Mazda 6 Service Manual: Exterior Care
The paintwork on your Mazda represents the latest technical developments in composition
and methods of application.
Environmental hazards, however, can harm the paint's protective properties, if
proper care is not taken.
Here are some examples of possible damage, with tips on how to prevent th ...