Mazda 6 Service Manual: Steering gear and linkage inspection
Rack Inspection
1. Inspect the rack for cracking, damage, and tooth wear. Replace it as necessary.
2. Measure the runout of the rack.
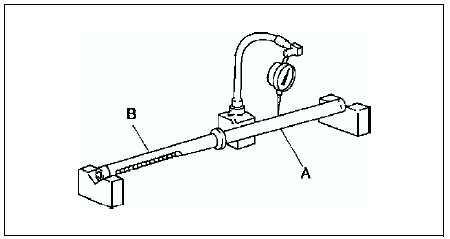
Runout
Near point A: 0.15 mm {0.006 in} max.Near point B: 0.20 mm {0.008 in} max.
3. If not within the specification, replace the rack.
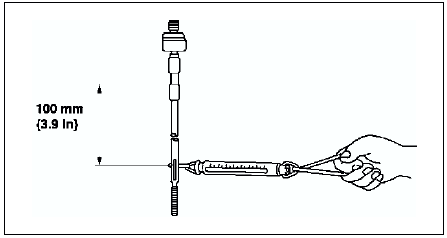
Tie-rod End Inspection
1. Inspect the tie-rod end for damage and boot cracks. Replace it as necessary.
2. Inspect the ball joint for looseness. Replace the tie-rod end as necessary.
3. Rotate the ball joint five times.
4. Measure the rotation torque of the ball joint using the SST
and a pull scale.

Rotation torque
0.4-2.7 N·m {3.5-27.5 kgf·cm, 3.1-23.8 in·lbf} Pull scale reading
3.4-25.5 N {0.35-2.60 kgf, 0.8-5.7 lbf}
5. If not within the specification, replace the tie-rod end.
Tie rod Inspection
1. Inspect the tie rod for bending and damage. Replace it as necessary.
2. Inspect the ball joint for looseness. Replace the tie rod as necessary.
3. Swing the tie rod five times.
4. Measure the swinging torque using a pull scale.
Swinging torque
0.1-4.0 N·m {1-40.7 kgf·cm, 0.9-35.3 in·lbf} Pull scale reading
0.6-24.5 N {0.06-2.49 kgf, 0.2-5.50 lbf}
5. If not within the specification, replace the tie-rod.
 Steering gear and linkage disassembly
Caution
Place copper plates, rag, or similar material in a vise, when
securing the mounting bracket portion of the steering gear.
Disassemble in the order indicated in the table.
.
Tie ...
 Steering gear and linkage assembly
Caution
Place copper plates, rag, or similar material in a vise, when
secure the mounting bracket portion of the steering gear.
Assemble in the order indicated in the table.
Mounting Ru ...
Other materials:
Mazda 6 Service Manual: Scheduled Maintenance (Mexico)
Follow Schedule 1 if the vehicle is operated mainly where none of the following
conditions apply.
Repeated short-distance driving
Driving in dusty conditions
Driving with extended use of brakes
Driving in areas where salt or other corrosive materials are used
Driving on rough or muddy ...
Mazda 6 Service Manual: Front shock absorber disposal
Warning
Whenever drilling into a shock absorber, wear protective eye wear.
The gas in the shock absorber is pressurized, and could spray metal chips
into the eyes and face when drilling.
1. Clamp a shock absorber on a flat surface or with the piston pointing
downwards.
2. Drill a 2-3 ...