Mazda 6 Service Manual: Valve clearance inspection
1. Disconnect the negative battery cable.
2. Remove the tire (RH).
3. Remove the splash shield (RH).
4. Remove the spark plugs. (See SPARK PLUG REMOVAL/INSTALLATION.)
5. Remove the high-tension lead.
6. Remove the oil control valve (OCV) connector.
7. Remove the ventilation hose.
8. Remove the cylinder head cover.
9. Verify that the engine is in cold condition.
10. Measure the valve clearance.
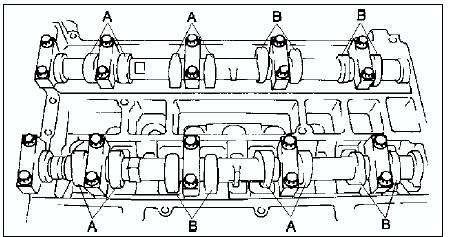
(1) Turn the crankshaft clockwise so that the No.1 piston is at TDC of the compression stroke.
(2) Measure the valve clearance at A in the figure.
- If the valve clearance exceeds the space the tappet. (See VALVE CLEARANCE ADJUSTMENT.)
Note
- Make sure to note the measured values for choosing the suitable replacement tappets.
Standard [Engine cold] IN: 0.22-0.28 mm {0.0087-0.0110 in} (0.25±0.03 mm {0.0098±0.0011 in})
EX: 0.27-0.33 mm {0.0106-0.0130 in} (0.30±0.03 mm {0.0118±0.0011 in})
(3) Turn the crankshaft 360°
clockwise so that the No.4 piston is at TDC of the compression stroke.
(4) Measure the valve clearance at B in the figure.
- If the valve clearance exceeds the standard, replace the tappet. (See VALVE CLEARANCE ADJUSTMENT.)
Note
- Make sure to note the measured values for choosing the suitable replacement tappets.
Standard [Engine cold] IN: 0.22-0.28 mm {0.0087-0.0110 in} (0.25±0.03 mm {0.0098±0.0011 in})
EX: 0.27-0.33 mm {0.0106-0.0130 in} (0.30±0.03 mm {0.0118±0.0011 in})
11. Install the cylinder head cover. (See Cylinder Head Cover Installation Note.)
12. Install the ventilation hose.
13. Install the oil control valve connector.
14. Install the high-tension lead. (See HIGH-TENSION LEAD REMOVAL/INSTALLATION.)
15. Install the spark plugs. (See SPARK PLUG REMOVAL/INSTALLATION.)
16. Install the splash shield (RH).
17. Install the tire (RH).
 Valve clearance
...
 Valve clearance adjustment
1. Disconnect the negative battery cable.
2. Remove the tire (RH).
3. Remove the splash shield (RH).
4. Remove the spark plugs. (See SPARK PLUG REMOVAL/INSTALLATION.)
5. Remove the high-tension le ...
Other materials:
Mazda 6 Service Manual: Power steering oil pump disassembly/assembly
Note
The following procedure is for replacement of the O-ring and oil
seal only. Replace the pump component if other repairs are necessary.
1. Disassemble in the order indicated in the table.
2. Assemble in the reverse order of disassembly.
Power Steering Oil Pump Component Disassemb ...
Mazda 6 Service Manual: Coming Home Light
The coming home light turns on the headlights (low beams) when the lever is operated.
To turn on the lights
When the lever is pulled with the ignition switched to ACC or OFF, the low beam
headlights turn on.
The headlights turn off after a certain period of time has elapsed after the
doors ar ...