Mazda 6 Service Manual: Air bag module and pre-tensioner seat belt deployment procedures
Warning
- A live (undeployed) air bag module and pre-tensioner seat belt may accidentally deploy when it is disposed of and cause serious injury. Do not dispose of a live (undeployed) air bag module and pre-tensioner seat belt. If the SSTs (Deployment tool and Adapter harness) are not available, consult the nearest Mazda representative for assistance.
Caution
- Deploying the air bag modules and pre-tensioner seat belts inside the vehicle may cause damage to the vehicle interior. When the vehicle is not to be scrapped, always deploy the air bag modules and pre-tensioner seat belts outside the vehicle.
- When the vehicle is to be scrapped, deploy the air bag modules and pre-tensioner seat belts inside the vehicle. (See Deployment Procedure for Inside of Vehicle (Only When Vehicle Is To Be Scrapped).)
- When the vehicle is not to be scrapped, deploy the air bag modules and pre-tensioner seat belts outside the vehicle. (See Deployment Procedure for Outside of Vehicle.)
Note
- When disposing of deployed air bag module and pre-tensioner seat belt, refer to the disposal procedure, (See AIR BAG MODULE AND PRE-TENSIONER SEAT BELT DISPOSAL PROCEDURES.)
Deployment Procedure for Inside of Vehicle (Only When Vehicle Is To Be Scrapped)
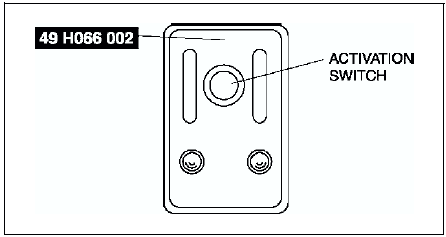
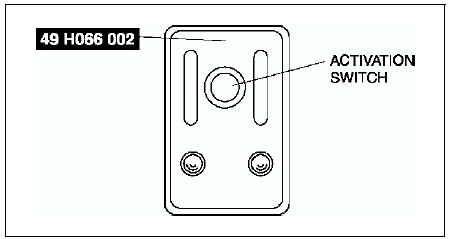
1. Inspect the SST
(Deployment tool). (See INSPECTION OF SST (DEPLOYMENT TOOL).)
2. Move the vehicle to an open space, away from strong winds, and close all of the vehicles doors and windows.
3. Turn the ignition switch to LOCK position.
4. Disconnect the negative battery cable and wait for more than 1 minute.
5. Follow the appropriate procedure for deploying the driver-side air bag module, passenger-side air bag module, side air bag module, curtain air bag module, or pre-tensioner seat belt.
Driver-side air bag module
Warning
- Driver-side air bag module is the dual inflator type. When the inflators are forced to be deployed simultaneously, one of them may fail to deploy. When disposing the air bag module, the inflators may be deployed accidentally. Make sure to deploy the inflators sequentially, following the procedures below.
1. Remove the driver-side air bag module. (See DRIVER-SIDE AIR BAG MODULE REMOVAL/INSTALLATION.)
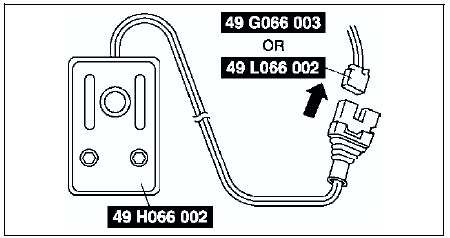
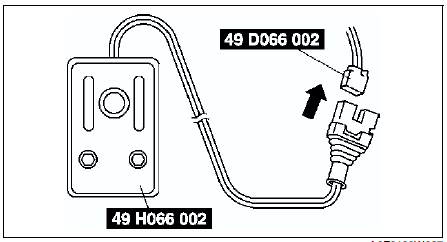
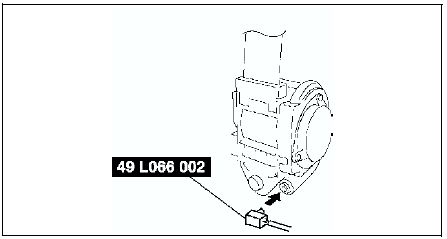
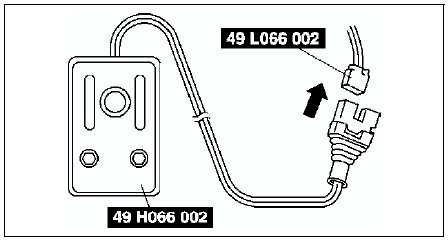
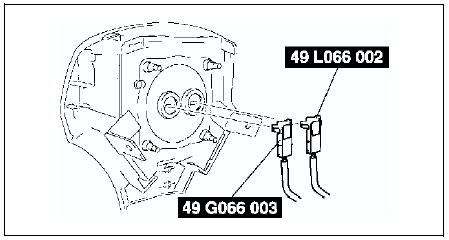
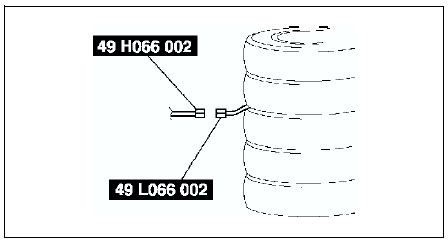
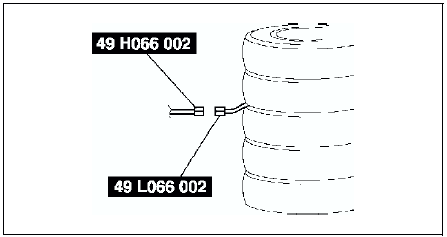
2. Connect the SST
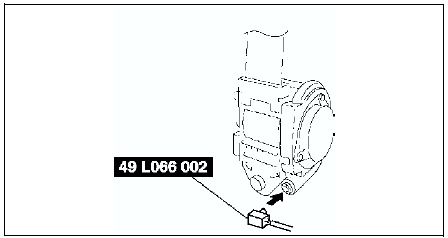
(Adapter harness) to the driver-side air bag module as shown in the figure.
3. Install the driver-side air bag module. (See DRIVER-SIDE AIR BAG MODULE REMOVAL/INSTALLATION.)
4. Connect the SST
(Deployment tool) to the SST (Adapter harness).
5. Connect the red clip of the SST
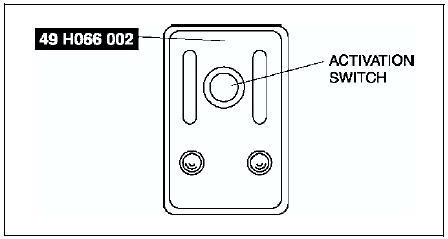
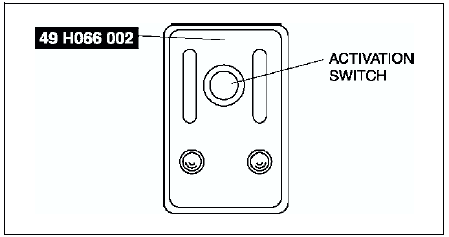
(Deployment tool) to the positive battery terminal and the black clip to the negative battery terminal.
6. Verify that the red light on the SST
(Deployment tool) is illuminated.
7. Make sure all persons are standing at least 6 m {20 ft}
away from the vehicle.
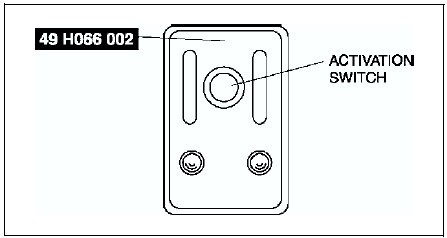
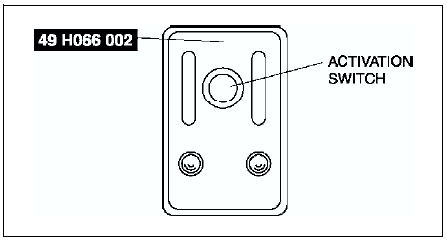
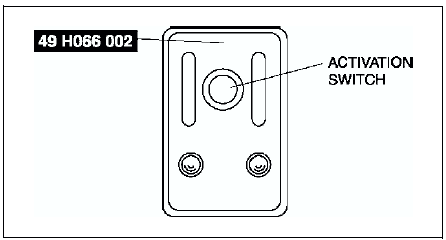
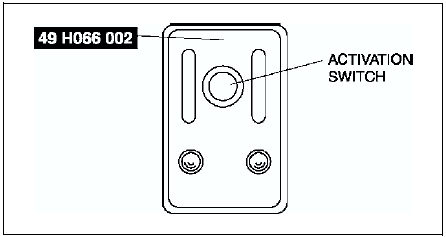
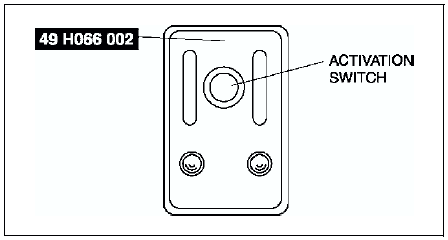
8. Press the activation switch on the SST
(Deployment tool) to deploy the driver-side air bag module.

9. Disconnect the SST
(Deployment tool) from the SST
(Adapter harness).
10. Connect the SST
(Deployment tool) to the SST
(Adapter harness).
11. Perform steps 5 through 8, in order to deploy the driver-side air bag module.
Passenger-side air bag module
Warning
- Passenger-side air bag module is the dual inflator type. When the inflators are forced to be deployed simultaneously, one of them may fail to deploy. When disposing the air bag module, the inflators may be deployed accidentally. Make sure to deploy the inflators sequentially, following the procedures below.
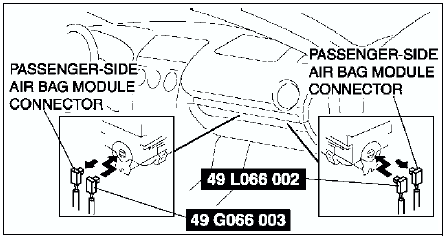
1. Remove the glove compartment.
2. Disconnect the passenger-side sir bag module connector.
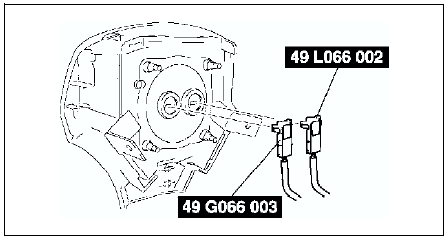
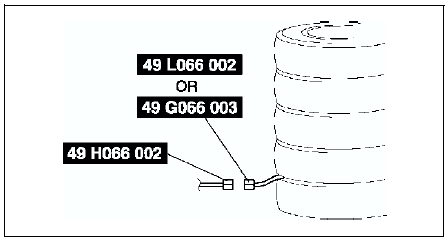
3. Connect the SST
(Adapter harness) to the passenger-side air bag module as shown it the figure.
4. Connect the SST
(Deployment tool) to the SST
(Adapter harness).
5. Connect the red clip of the SST
(Deployment tool) to the positive battery terminal and the black clip to the negative battery terminal.
6. Verify that the red light on the SST (Deployment tool) is illuminated.
7. Make sure all persons are standing at least 6 m {20 ft}
away from the vehicle.
8. Press the activation switch on the SST
(Deployment tool) to deploy the passenger-side air bag module.
9. Disconnect the SST
(Deployment tool) from the SST
(Adapter harness).
10. Connect the SST
(Deployment tool) to the SST
(Adapter harness).
11. Perform steps 5 through 8, in order to deploy the passenger-side air bag module.
Side air bag module
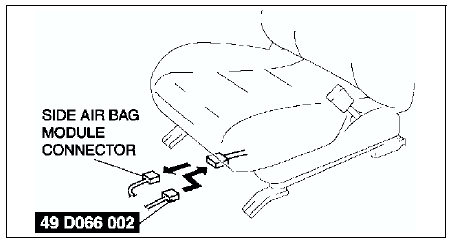
1. Disconnect the side air bag module connector.
2. Connect the SST
(Adapter harness) to the side air bag module.
3. Connect the SST
(Deployment tool) to the SST
(Adapter harness).
4. Connect the red clip of the SST
(Deployment tool) to the positive battery terminal and the black clip to the negative battery terminal.
5. Verify that the red light on the SST
(Deployment tool) is illuminated.
6. Make sure all persons are standing at least 6 m {20 ft}
from the vehicle.
7. Press the activation switch on the SST
(Deployment tool) to deploy the side air bag module.
Curtain air bag module
1. Remove the side tire house trim. (4SD)
2. Remove the side trunk side trim. (5HB)
3. Disconnect the curtain air bag module connector.

4. Connect the SST
(Adapter harness) to the curtain air bag module.
5. Connect the SST
(Deployment tool) to the SST
(Adapter harness).

6. Connect the red clip of the SST
(Deployment tool) to the positive battery terminal and the black clip to the negative battery terminal.
7. Verify that the red light on the SST
(Deployment tool) is illuminated.
8. Make sure all persons are standing at least 6 m {20 ft}
from the vehicle.
9. Press the activation switch on the SST
(Deployment tool) to deploy the curtain air bag module.
Pre-tensioner seat belt
1. Remove the B-pillar lower trim.
2. Remove the pre-tensioner seat belt and connect the SST
(Adapter harness) to it as shown in the figure. (See FRONT SEAT BELT REMOVAL/INSTALLATION.)
3. Install the pre-tensioner seat belt.
4. Connect the SST
(Deployment tool) to the SST
(Adapter harness).
5. Connect the red clip of the SST
(Deployment tool) to the positive battery terminal and the black clip to the negative battery terminal.
6. Verify that the red light on the SST
(Deployment tool) is illuminated.
7. Make sure all persons are standing at least 6 m {20 ft}
from the vehicle.
8. Press the activation switch on the SST
(Deployment tool) to deploy the pre-tensioner seat belt.
Deployment Procedure for Outside of Vehicle
1. Inspect the SST (Deployment tool). (See INSPECTION OF SST (DEPLOYMENT TOOL).)
2. Turn the ignition switch to LOCK position.
3. Disconnect the negative battery cable and wait for more than 1 minute.
4. Follow the appropriate procedure for deploying the driver-side air bag module, passenger-side air bag module, side air bag module, curtain air bag module, or pre-tensioner seat belt.
Driver-side air bag module
Warning
- Driver-side air bag module is the dual inflator type. When the inflators are forced to be deployed simultaneously, one of them may fail to deploy. When disposing the air bag module, the inflators may be deployed accidentally. Make sure to deploy the inflators sequentially, following the procedures below.
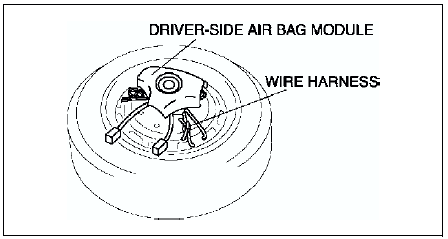
1. Remove the driver-side air bag module. (See DRIVER-SIDE AIR BAG MODULE REMOVAL/INSTALLATION.)
2. Connect the SST
(Adapter harness) to the driver-side air bag module as shown in the figure,
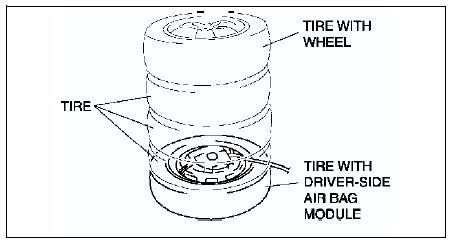
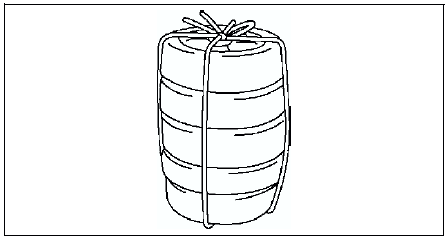
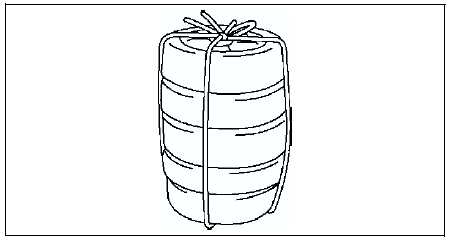
3. Place the driver-side air bag module on the center of the tire wheel with the module facing up. To secure the air bag module to the tire wheel, wrap the wire harness through the wheel and around the bolt installation hole at least four times.
Warning
- If the air bag module is not properly installed to the tire wheel, serious injury may occur when the module is deployed. When installing the air bag module to the tire wheel, make sure the module is facing up.
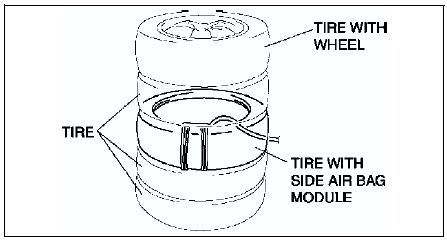
4. Stack three tires on top of the tire with the air bag module. Stack another tire that has a wheel on top of the four tires.
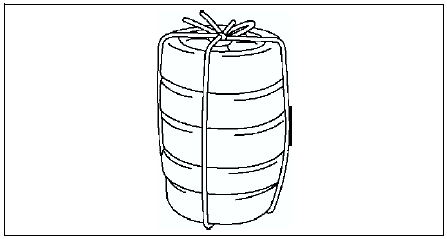
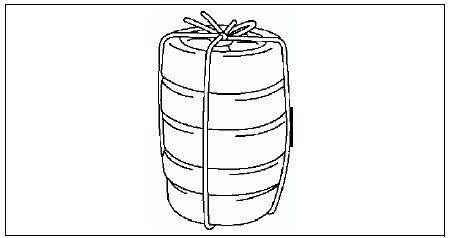
5. Tie all tires together with wire.
6. Connect the SST
(Deployment tool) to the SST
(Adapter harness).
7. Connect the red clip of the SST
(Deployment tool) to the positive battery terminal and the black clip to the negative battery terminal.
8. Verify that the red light on the SST
(Deployment tool) is illuminated.
9. Make sure all persons are standing at least 6 m {20 ft}
away from the vehicle.
10. Press the activation switch on the SST
(Deployment tool) to deploy the driver-side air bag module.
11. Disconnect the SST
(Deployment tool) from the SST
(Adapter harness).
12. Connect the SST
(Deployment tool) to the SST
(Adapter harness).
13. Perform steps 7 through 10, in order to deploy the driver-side air bag module.
Passenger-side air bag module
Warning
- Passenger-side air bag module is the dual inflator type. When the inflators are forced to be deployed simultaneously, one of them may fail to deploy. When disposing the air bag module, the inflators may be deployed accidentally. Make sure to deploy the inflators sequentially, following the procedures below.
1. Remove the passenger-side air bag module. (See PASSENGER-SIDE AIR BAG
MODULE REMOVAL/
INSTALLATION.)
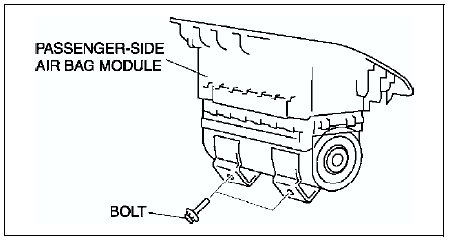
2. Install the bolts to the passenger-side air bag module.
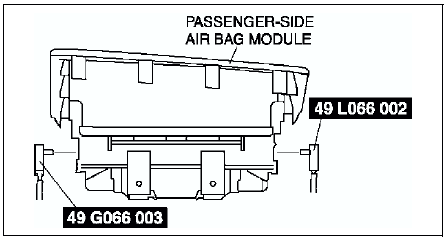
3. Connect the SST
(Adapter harness) to the passenger-side air bag module as shown in the figure.
4. Tie the passenger-side air bag module to the tire with the module facing the center of the tire. Wrap the wire harness through the tire and around the bolts at least four times.
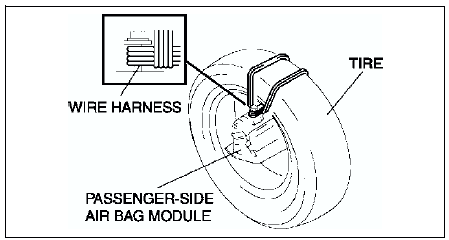
Warning
- If the air bag module ia not properly installed to the tire, serious injury may occur when the module is deployed, When installing the air bag module to the tire, make sure the module is facing the center of the tire.
5. Stack the tire with the passenger-side air bag module on top of two tires. Stack another tire that has a wheel on top of the four tires.
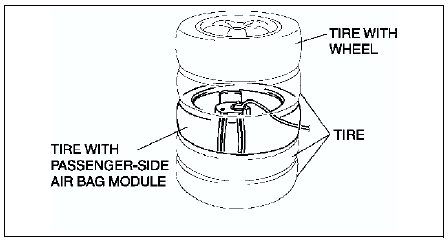
6. Tie all tires together with wire.
7. Connect the SST
(Deployment tool) to the SST
(Adapter harness).
8. Connect the red clip of the SST
(Deployment tool) to the positive battery terminal and the black clip to the negative battery terminal.
9. Verify that the red light on the SST
(Deployment tool) is illuminated.
10. Make sure all persons are standing at least 6 m {20 ft}
away from the vehicle.
11. Press the activation switch on the SST
(Deployment tool) to deploy the passenger-side air bag module.
12. Disconnect the SST
(Deployment tool) from the SST
(Adapter harness).
13. Connect the SST
(Deployment tool) to the SST
(Adapter harness).
14. Perform steps 8 through 11, in order to deploy the passenger-side air bag module.
Side air bag module
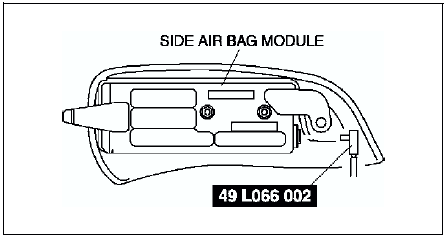
1. Remove the side air bag module. (See SIDE AIR BAG MODULE REMOVAL/INSTALLATION.)
2. Connect the SST
(Adapter harness) to the side air bag module as shown in the figure.
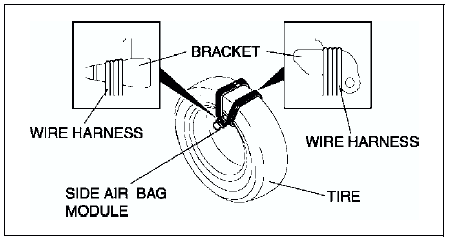
3. Tie the side air bag module to the tire with the module facing the center of the tire. Wrap the wire harness through the tire and around the bracket at least four times.
Warning
- If the air bag module is not properly installed to the tire, serious injury may occur when the module is deployed. When installing the air bag module to the tire, make sure the module is facing the center of the tire.
4. Stack the tire with the side air bag module on top of two tires. Stack a tire on top of three tires. Stack another tire that has a wheel on top of the four tires.
5. Tie all tires together with wire.
6. Control the SST
(Deployment tool) to the SST
(Adapter harness).
7. Connect the red clip of the SST
(Deployment tool) to the positive battery terminal and the black clip to the negative battery terminal.
8. Verify that the red light on the SST
(Deployment tool) is illuminated.
9. Make sure all persons are standing at least 6 m {20 ft}
from the vehicle.
10. Press the activation switch on the SST
(Deployment tool) to deploy the side air bag module.
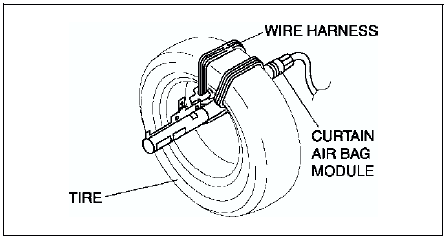
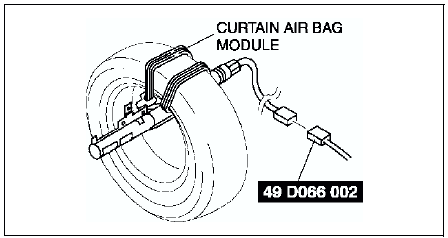
Curtain air bag module
1. Remove the curtain air bag module. (See CURTAIN AIR BAG MODULE REMOVAL/INSTALLATION.)
2. Secure the curtain air bag module in a vise, and cut off the deployment section, as shown in the figure.
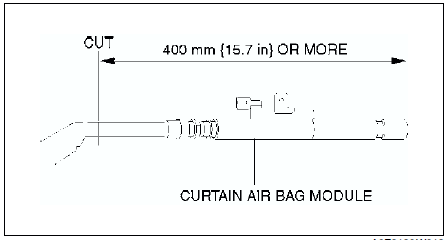
Warning
- Be sure not to collapse the pipe on the side where it is cut. If it is collapsed, the interior pressure of the pipe will build up and can cause it to explode during air bag module deployment.
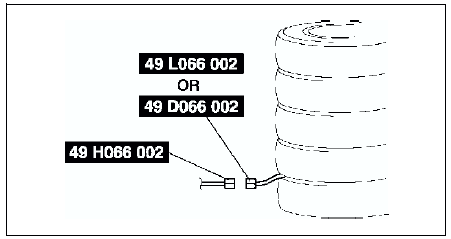
3. Connect the SST
(Adapter harness) to the curtain air bag module as shown in the figure. (5HB)

4. Tie the side air bag module to the tire with the module facing the center of the tire. Wrap the wire harness through the tire and around the bracket at least four times.
Warning
- If the air bag module is not properly installed to the tire, serious injury may occur when the module is deployed. When installing the air bag module to the tire, make sure the module is facing the downward.
5. Connect the SST
(Adapter harness) to the curtain air bag module as shown in the figure. (4SD, RH only)
6. Stack the tire with the curtain air bag module on top of two tires. Stack a tire on top of three tires. Stack another tire that has a wheel on top of the four tires.
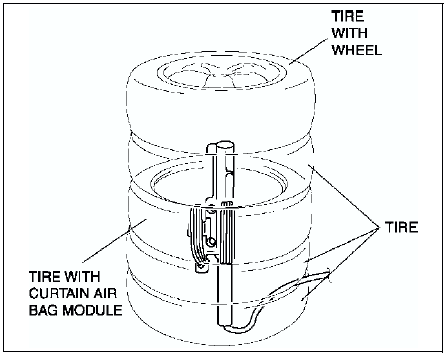
7. Tie all tires together with wire.

8. Control the SST
(Deployment tool) to the SST
(Adapter harness).
9. Connect the red clip of the SST
(Deployment tool) to the positive battery terminal and the black clip to the negative battery terminal.
10. Verify that the red light on the SST
(Deployment tool) is illuminated.
11. Make sure all persons are standing at least 6 m {20 ft}
from the vehicle.
12. Press the activation switch on the SST
(Deployment tool) to deploy the curtain air bag module.
Pre-tensioner seat belt
1. Remove the pre-tensioner seat belt. (See FRONT SEAT BELT REMOVAL/INSTALLATION.)
Warning
- If the pre-tensioner seat belt is not properly installed to the tire, serious injury may occur when the pre-tensioner part is deployed. When installing the pre-tensioner seat belt to the tire, make sure the pre-tensioner part is inside the tire.
2. Connect the SST
(Adapter harness) to the pre-tensioner seat belt as shown in the figure.
3. With the pre-tensioner part inside the tire, tie the pre-tensioner seat belt to the tire. Wrap the wire harness through the tire and around the pre-tensioner seat belt at least four times.
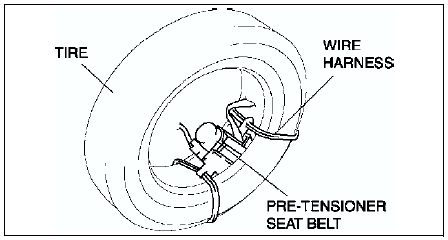
4. Stack the tire with the pre-tensioner seat belt on top of two tires. Stack a tire on top of the three tires. Stack another tire that has a wheel on top of the four tires.
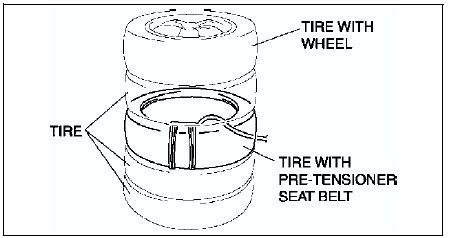
5. Tie all tires together with wire.
6. Connect the SST
(Deployment tool) to the SST
(Adapter harness).
7. Connect the red clip of the SST
(Deployment tool) to the positive battery terminal and the black clip to the negative battery terminal.
8. Verify that the red light on the SST
(Deployment tool) is illuminated.
9. Make sure all persons are standing at least 6 m {20 ft}
from the vehicle.
10. Press the activation switch on the SST
(Deployment tool) to deploy the pre-tensioner seat belt.
 Passenger-side air bag cut-off indicator light removal/installation
1. Remove the center panel module. (See CENTER PANEL MODULE
REMOVAL/INSTALLATION.)
2. Remove in the order indicated in the table.
3. Install in the reverse order of removal. ...
 Air bag module and pre-tensioner seat belt disposal procedures
Warning
Before scrapping a vehicle with a live (undeployed) air bag module
and pre-tensioner seat belt, deploy the air bag module and pre-tensioner
seat belt. Never dispose of a live (undepl ...
Other materials:
Mazda 6 Service Manual: Curtain air bag module removal/installation
Warning
Handling the air bag module improperly can accidentally deploy the air bag
module, which may seriously injure you. Read AIR BAG SYSTEM SERVICE WARNINGS
before handling the air bag module. (See SERVICE WARNINGS.)
1. Turn the ignition switch to LOCK position.
2. Disconnect the nega ...
Mazda 6 Service Manual: Variable air duct (vad) shutter valve inspection (l3)
1. Remove the air cleaner case. (See INTAKE-AIR SYSTEM REMOVAL/INSTALLATION.)
2. Disconnect the vacuum hose from the VAD shutter valve actuator.
3. Connect a vacuum pump to the VAD shutter valve actuator.
4. Apply vacuum and verify that the rod moves.
If the rod dose not move, replace the a ...