Mazda 6 Service Manual: Air bleeding
Caution
- Maintain the fluid level in the reservoir tank properly while bleeding the air.
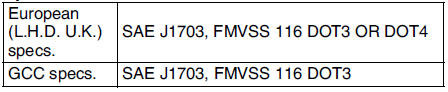
Specified fluid
Note
- The brakes should be bled whenever a brake line is disconnected. If a hydraulic line is disconnected at the master cylinder, start at the slave cylinder farthest from the brake master cylinder, and move to the next farthest slave cylinder until all four cylinders have been bled. If the disconnection point is anywhere except the master cylinder, start at the point closest to the disconnection, and move to the next closest slave cylinder until all four cylinders have been bled.
1. Remove the bleeder cap and attach a vinyl tube to the bleeder screw.
2. Place the other end of the vinyl tube in a clear, fluid-filled container.
3. One person should depress the brake pedal a few times, and then hold it in the depressed position.
4. A second person should loosen the bleeder screw, drain out the fluid and close the screw using the SST
.
Tightening torque Front:6.9-9.8 N·m
{71-99 kgf·cm, 62-86 in·lbf} Rear:5.9-8.8 N·m
{61-89 kgf·cm, 53-77 in·lbf}
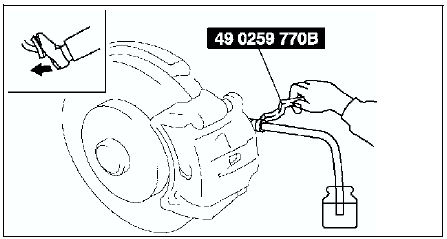
5. Repeat steps 3 and 4 until no air bubbles are seen.
6. Bleed air from each component by following the procedure above.
7. After air bleeding, check the following:
- Brake operation
- fluid leakage
- fluid level

 Vacuum hose check valve inspection (power brake unit)
1. Remove the clamps and vacuum hose.
2. Apply both suction and pressure to the engine-side hose, and verify that
air blows only toward that side.
If air flows in both directions or not at all, ...
Other materials:
Mazda 6 Service Manual: Speedometer, Odometer, Trip Meter and Trip Meter Selector (Without Multiinformation
Display)
The speedometer indicates the speed of the vehicle.
The display mode can be changed from odometer to trip meter A to trip meter B
and then back to odometer by pressing the selector while one of them is displayed.
The selected mode will be displayed.
Odometer
The odometer records the total d ...
Mazda 6 Service Manual: Snow Tires
Use snow tires on all four wheels
Do not go faster than 120 km/h (75 mph) while driving with snow tires. Inflate
snow tires 30 kPa (0.3 kgf/cm2, 4.3 psi) more than recommended on the tire pressure
label (driver's door frame), but never more than the maximum cold-tire pressure
shown on the tir ...