Mazda 6 Owners Manual: Auto Lock/Unlock Function
WARNING
Do not pull the inner handle on a front door:
Pulling the inner handle on a front door while the vehicle is moving is dangerous. Passengers can fall out of the vehicle if the door opens accidentally , which could result in death or serious injury.
- When the vehicle speed exceeds 20 km/h (12 mph), all doors lock automatically.
- When the ignition is switched off, all doors unlock automatically.
These functions can also be disabled so that they do not operate.
Auto lock/unlock function setting change using door-lock switch
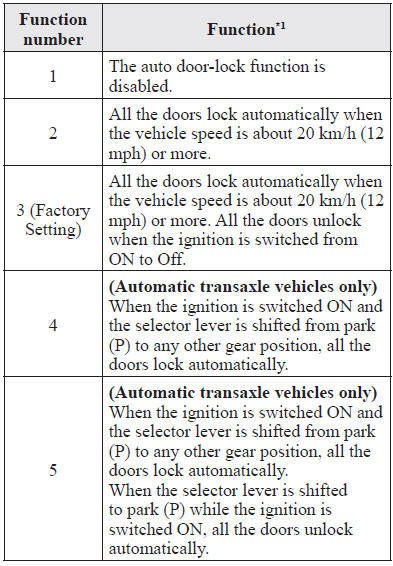
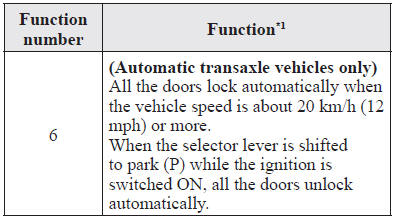
The doors can be set to lock or unlock automatically by selecting any one of the functions from the following table and using the driver's door-lock switch on the interior door panel.
NOTE
- Function number 3 in the following table is the factory setting for your vehicle.
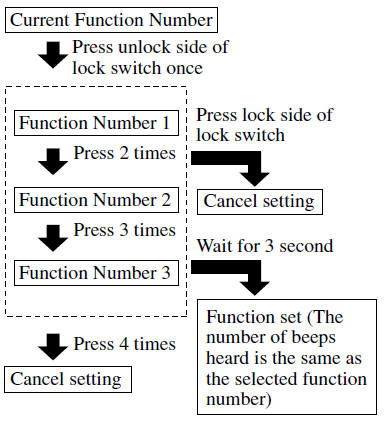
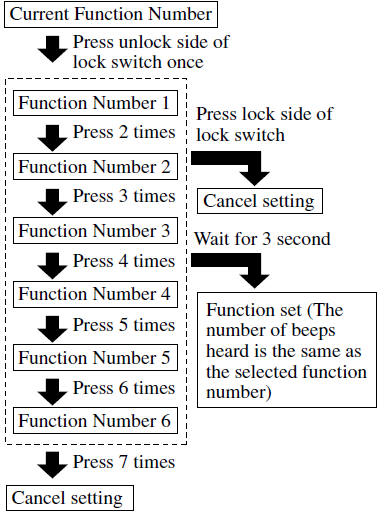
- There are only a total of six auto lock/ unlock settings available for automatic transaxle vehicles, and three for manual transaxle vehicles. Be sure to press the unlock side of the driver's door-lock switch the correct number of times according to the selected function number. If the switch is mistakenly pressed seven times on an automatic transaxle vehicle or four times on a manual transaxle, the procedure will be cancelled. If this occurs, start the procedure from the beginning.


*1 Other settings for the auto door lock function are available at an Authorized Mazda Dealer. For details consult an Authorized Mazda Dealer. Refer to Personalization Features.
Settings can be changed using the following procedure.
1. Safely park the vehicle. All doors must remain closed.
2. Switch the ignition ON.
3. Press and hold the lock side of the driver's door-lock switch within 20 seconds of switching the ignition ON, and make sure a beep sound is heard about eight seconds afterwards.
4. Refer to the auto lock/unlock function setting table, determine the function number for the desired setting. Press the unlock side of the driver's door-lock switch the same number of times as the selected function number (Ex. If you select function 2, press the unlock side of the switch only 2 times).
5. Three seconds after the function setting has been changed, a beep sound will beep in the amount of the selected function number. (Ex. Function number 3 = 3 beep sounds)
(Manual transaxle vehicles)

(Automatic transaxle vehicles)

NOTE
- The doors cannot be locked or unlocked while the setting function is being performed.
- The procedure can be cancelled by pressing the lock side of the driver's door-lock switch.
 Locking, Unlocking with Door- Lock Switch
All doors lock automatically when the lock side is pressed. They unlock when
the unlock side is pressed.
Driver's door
Front passenger's door
To lock all the doors from an open front door, pr ...
 Locking, Unlocking with Door- Lock Knob
Operation from inside
To lock any door from the inside, press the door-lock knob.
To unlock, pull it outward. This does not operate the other door locks.
NOTE
The red indication can be seen when ...
Other materials:
Mazda 6 Owners Manual: Blind Spot Monitoring (BSM) (Some models)
The Blind Spot Monitoring (BSM) is designed to assist the driver in checking
the area to the rear of the vehicle on both sides during lane changes by notifying
the driver of the presence of vehicles approaching from the rear in an adjacent
lane.
The Blind Spot Monitoring (BSM) detects vehicle ...
Mazda 6 Owners Manual: Generator removal/installation
Warning
When the battery cables are connected, touching the vehicle body with
generator terminal B will generate sparks. This can cause personal injury, fire,
and damage to the electrical components. Always disconnect the battery negative
cables before performing the following operation.
...
