Mazda 6 Service Manual: Control valve body removal
On-Vehicle Removal
Warning
- Using compressed air can cause dirt and other particles to fly out, causing injury to the eyes. Wear protective eyes whenever using compressed air.
Caution
- Clean the transaxle exterior throughout with a steam cleaner or cleaning solvents before removal.
- If any old sealant gets into the transaxle during installation of the oil pan, trouble may occur in the transaxle case and oil pan. Clean with cleaning fluids.
1. Disconnect the negative battery cable.
2. Drain the ATF into a separate suitable container. (See AUTOMATIC TRANSAXLE FLUID (ATF) REPLACEMENT.)
3. Remove the under cover.
4. Remove the front tires and splash shield.
5. Remove the crossmember. (See FRONT CROSSMEMBER REMOVAL/INSTALLATION.)
6. Remove the oil pan.
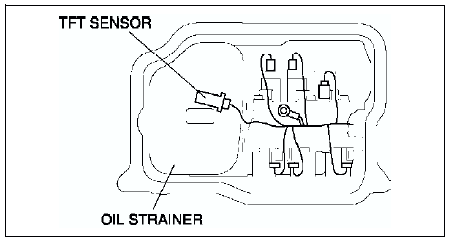
7. Disconnect the transaxle connectors and transaxle fluid temperature (TFT) sensor connector.
8. Remove the oil strainer.
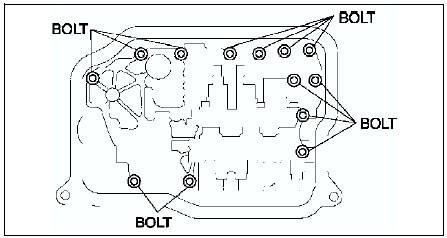
9. Remove the control valve body installation bolts A as shown, then remove the control valve body component as shown.
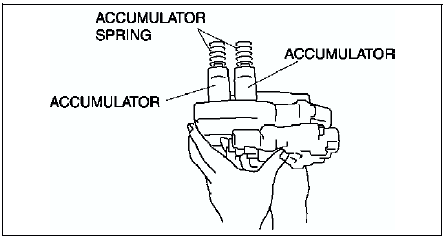
10. Remove the accumulators and accumulator springs.
 Oil seal replacement
1. Drain the ATF. (See AUTOMATIC TRANSAXLE FLUID (ATF) REPLACEMENT.)
Caution
The oil seal is easily damaged by the sharp edges of the drive
shaft splines. Do not let the splines contact the oi ...
 Control valve body installation
On-Vehicle Installation
Caution
Be sure to align the parking rod and the manual valve.
1. Install the accumulator springs and accumulators into the transaxle case.
2. Install the contro ...
Other materials:
Mazda 6 Service Manual: Voice Recognition
In this section, the basic operation of the voice recognition is explained.
Activating Voice Recognition
Press the talk button.
Ending Voice Recognition
Use one of the following methods:
Press the hang-up button.
Say, “Cancel”.
Operate the commander switch or the center display (only ...
Mazda 6 Service Manual: Receiving an Incoming Call
When an incoming call is received, the incoming call notification screen is displayed.
The “Incoming Call Notifications” setting must be on.
To accept the call, press the pick-up button on the audio control switch or select
on the screen.
To reject the call, press the hang-up button on the ...