
Mazda 6 Service Manual: Oil seal replacement
1. Drain the ATF. (See AUTOMATIC TRANSAXLE FLUID (ATF) REPLACEMENT.)
Caution
- The oil seal is easily damaged by the sharp edges of the drive shaft splines. Do not let the splines contact the oil seal.
2. Remove the drive shaft. (See DRIVE SHAFT REMOVAL/INSTALLATION.)
3. Remove the oil seal.
4. Using the SST
and a hammer, tap a new oil seal in evenly until the SST
contacts the transaxle case.
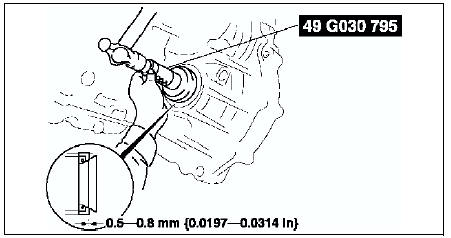
5. Coat the lip of the oil seal with transaxle oil.
6. Install the drive shaft. (See DRIVE SHAFT REMOVAL/INSTALLATION.)
7. Add ATF to the specified level. (See AUTOMATIC TRANSAXLE FLUID (ATF) REPLACEMENT.)
8. Carry out the mechanical system test. (See MECHANICAL SYSTEM TEST.)
 Automatic transaxle removal/installation
1. Disconnect the negative battery cable.
2. Remove the battery and battery tray.
3. Remove the aircleaner component. (See INTAKE-AIR SYSTEM
REMOVAL/INSTALLATION.)
4. Remove the front tires and s ...
 Control valve body removal
On-Vehicle Removal
Warning
Using compressed air can cause dirt and other particles to fly
out, causing injury to the eyes. Wear protective eyes whenever using
compressed air.
Caution
...
Other materials:
Mazda 6 Service Manual: Maintenance Monitor
1. Select the icon on the home
screen to display the “Applications” screen.
2. Select “Vehicle Status Monitor” to display the current warnings.
3. Select “Maintenance” to display the maintenance list screen.
4. Switch the tab and select the setting item you want to change.
You can ...
Mazda 6 Service Manual: Purge solenoid valve removal/installation
1. Disconnect the negative battery cable.
2. Remove in the order indicated in the table.
3. Install in the reverse order of removal.
Vacuum Hose Installation Note
Attach the vacuum hose onto the purge solenoid valve until it contacts the
stopper.
Evaporative Hose Installation Note
Attach ...