
Mazda 6 Service Manual: Drive plate removal/installation
1. Remove the transaxle.(See AUTOMATIC TRANSAXLE REMOVAL/INSTALLATION.)
2. Remove in the order indicated in the figure.
3. Install in the reverse order of removal.
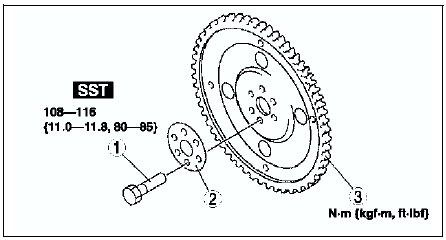
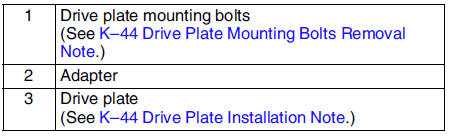
Drive Plate Mounting Bolts Removal Note
1. Set the SST
or equivalent against the drive plate.
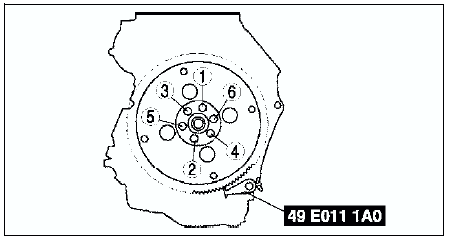
2. Remove the bolts and the drive plate.
Drive Plate Installation Note
Caution
- If the bolts are reused, remove the oil sealant from the bolt threads. Tightening a bolt that has old sealant on it can cause thread damage.
1. Remove the sealant from the bolts hole in the crankshaft and from the drive plate mounting bolts.
Note
- If all the previous sealant cannot be removed from a bolt, replace the bolts.
- Do not apply sealant if a new bolts is used.
2. Install the drive plate.
3. Install the adapter.
4. Apply sealant to the drive plate mounting bolts and install them.
5. Set the SST or equivalent against the drive plate.
Caution
- When installing sealant covered bolts, tighten them immediately. Leaving these bolts in a half installed condition could cause them to be stuck that way, due to the natural hardening or the sealant.
6. Tighten the drive plate mounting bolts in two or three steps in the order shown.
Tightening torque 108-1116 N·m {11.0-11.8 kgf·m, 80-85 ft·lbf}
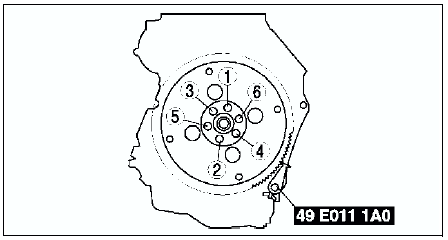
7. Install the transaxle. (See AUTOMATIC TRANSAXLE REMOVAL/INSTALLATION.)
 Oil cooler disassembly/assembly
1. Disassemble in the order indicated in the table.
2. Assemble in the reverse order of disassembly.
Radiator Outer Tank (In Tank Oil Cooler) Removal Note
1. Inspect the height of the header ta ...

Other materials:
Mazda 6 Service Manual: High Beam Control System (HBC) (Some models)
The High Beam Control System (HBC) determines the conditions in front of the
vehicle using the Forward Sensing Camera (FSC) while driving in darkness to automatically
switch the headlights between high and low beams.
Refer to Warning/Indicator Lights.
While driving the vehicle at a speed of ab ...
Mazda 6 Service Manual: Front and rear fog light switch inspection
Light switch LH side
1. Remove the light switch. (See LIGHT SWITCH REMOVAL/INSTALLATION.)
2. Inspect for continuity between the light switch terminals using an
ohmmeter.
If not as specified, replace the light switch.
Light switch RH side
1. Remove the light switch. (See LIGHT SWITCH ...