Mazda 6 Service Manual: Expansion valve removal/installation
1. Disconnect the negative battery cable.
2. Discharge the refrigerant from the system. (See RECOVERY.) (See CHARGING.)
Caution
- If moisture or foreign material enters the refrigeration cycle, cooling ability will be lowered and abnormal noise will occur. Always immediately plug open fittings after removing any refrigeration cycle parts to keep moisture or foreign material out of the cycle.
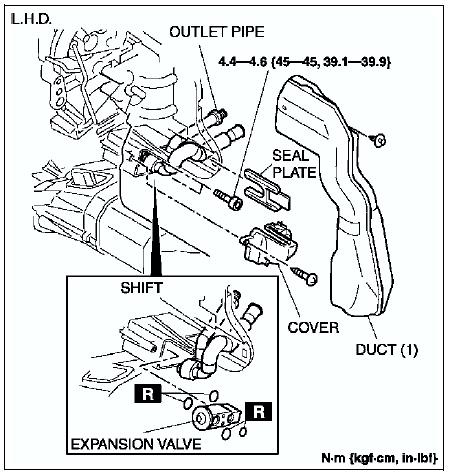
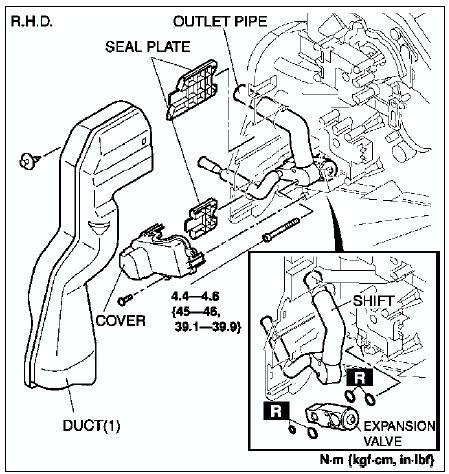
3. Disconnect the cooler hose (Lo) (L.H.D) or cooler pipe No.4 (R.H.D.) and cooler pipe No.3. (See REFRIGERANT LINES REMOVAL/INSTALLATION.)
4. Remove the dashboard. (See DASHBOARD REMOVAL/INSTALLATION.)
5. Remove the duct (1).
6. Remove the air mix actuator. (Full-auto air conditioner)
7. Remove the screws and cover.
8. Remove the one plate (L.H.D.) or two plates (R.H.D.).
9. Remove the bolts and shift the outlet pipe. Do not allow compressor oil to spill.
10. Remove the expansion valve. Do not allow compressor oil to spill.
11. Install in the reverse order of removal.
12. Perform the refrigerant system performance test. (See REFRIGERANT SYSTEM PERFORMANCE TEST.)
 A/c unit disassembly/assembly
1. Disassemble in the order indicated in the table.
2. Assemble in the reverse order of disassembly.
Evaporator Temperature Sensor Assembly Note
Assemble the evaporator temperature sensor as ...
 Evaporator inspection
1. Remove the A/C unit. (See A/C UNIT REMOVAL/INSTALLATION.)
2. Remove the evaporator from the A/C unit.
3. Inspect for cracks, damage, and oil leakage.
If any problems are found, replace the ev ...
Other materials:
Mazda 6 Service Manual: Indication on Display
The Distance Recognition Support System (DRSS) operation status is indicated
in the active driving display or multi-information display. Regarding malfunctions,
check the vehicle conditions or have it inspected by an Authorized Mazda Dealer
according to the content of the displayed message.
R ...
Mazda 6 Service Manual: Supplemental Restraint System (SRS) Precautions
The front and side supplemental restraint systems (SRS) include different types
of air bags. Please verify the different types of air bags which are equipped
on your vehicle by locating the “SRS AIRBAG” location indicators. These indicators
are visible in the area where the air bags are in ...